Spring的Autowired自动装配(XML版本+Annotation版本+源码+解析)
?
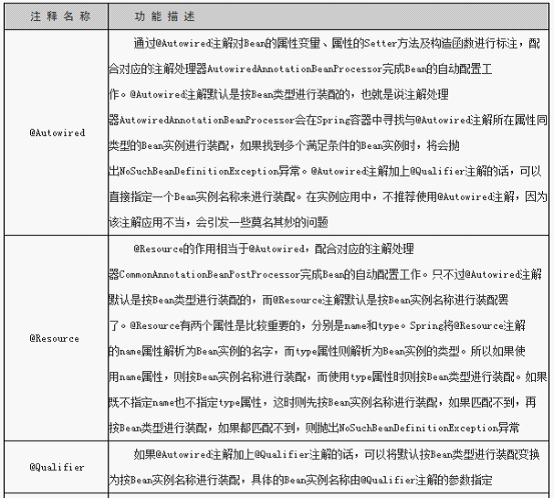
@Autowired自动装配上面的例子我们用的都是手动装配的,如果DAO-Service一多那就很麻烦了,那么我们需要偷懒一下,然spring去帮我们自动装配,自动装配的类型有两种,一种是byName,一种是byType。
?
*。如果是XML版,只需要在bean里面加个?autowire="byXXX"就行了。
重写一下DAO.Impl的toString()方法来做测试,看看注入的ID。
@Override
public?String?toString()?{
return?"daoId="?+?daoId;
}
-----------------------------------------------------
?<bean?name="userDAO1"?style="margin-bottom: 0pt; margin-top: 0pt; text-align: justify;">??<property?name="daoId"?value="1"></property>
??</bean>
??
?<bean?name="userDAO2"?style="margin-bottom: 0pt; margin-top: 0pt; text-align: justify;">??<property?name="daoId"?value="2"></property>
??</bean>
??<bean?id="userService"?style="margin-bottom: 0pt; margin-top: 0pt; text-align: justify;">??</bean>
-----------------------------------------------------
?
?①这样的运行结果是null,因为是byName按名字分配的,没有和userDAO的名字相同,如果将"userDAO1"改为"userDAO"则输出daoID=1,同理可得改"userDAO2"为"userDAO"则输出daoID=2。
?
②记得不能两个同时改为"userDAO",否则报错,找到两个同名,不知道配那个。
?
?③如果直接修改?autowire="byType"会报错,
Error?creating?bean?with?name?'userService'?defined?in?class?path?resource?[beans.xml]:?Unsatisfied?dependency?expressed?through?bean?property?'userDAO':?:?No?unique?bean?of?type?[com.bjsxt.dao.UserDAO]?is?defined:?expected?single?matching?bean?but?found?2:?[userDAO1,?userDAO2];?nested?exception?is?org.springframework.beans.factory.NoSuchBeanDefinitionException:?No?unique?bean?of?type?[com.bjsxt.dao.UserDAO]?is?defined:?expected?single?matching?bean?but?found?2:?[userDAO1,?userDAO2]
就是说找到两个不知道配哪个好......(?-?-?)
?
④将"userDAO2"的bean用<!--?-->注释掉,然后改autowire="byType",则输出的是daoID=1.
或将"userDAO1"的bean用<!--?-->注释掉,然后改autowire="byType",则输出的是daoID=2.
-?-要是两个同时注释掉的话,注意是不会报错,因为没得装配了,跟①的情况差不多,只能输出null。
?
?
Annotation版本的@Autowired自动装配
?
首先得对UserService类的setter注入做做改进,如果是用constructor则对构造方法进行改进,方法和道理一样。
?
-----------------------------------------------------
<!--如果XML里面只有一个可以装配,那么setter直接加个@Autowired以就可以了.-->
?
<bean?id="u1"
?style="margin-bottom: 0pt; margin-top: 0pt; text-align: justify;">??</bean>
-----------------------------------------------------
@Autowired
public?void?setUserDAO(UserDAO?userDAO)?{
this.userDAO?=?userDAO;
}
-----------------------------------------------------
<!--如果XML里面有多个可以装配,那么setter上面加个@Autowired之外还要在参数里面加个@Qualifier("u1")指定装配的是哪个对象-->
?
?<bean?id="u1"?style="margin-bottom: 0pt; margin-top: 0pt; text-align: justify;">??</bean>
??<bean?id="u2"?style="margin-bottom: 0pt; margin-top: 0pt; text-align: justify;">??</bean>
-----------------------------------------------------
//加个@Autowired以及指定注入的是u1?@Qualifier("u1")
?
@Autowired
public?void?setUserDAO(@Qualifier("u1")?UserDAO?userDAO)?{
this.userDAO?=?userDAO;
}
?
-----------------------------------------------------
补充:@Resource的用法:
跟@autowired差不多,不过默认是用byName,得名字完全对应才能自动装配
@Resource
public void setUserDAO( UserDAO userDAO) {
this.userDAO = userDAO;
}
-----------------------------------------------------
? <bean id="userDAO" style="margin-bottom: 0pt; margin-top: 0pt; text-align: justify;">? </bean>
? <bean id="u2" style="margin-bottom: 0pt; margin-top: 0pt; text-align: justify;">? </bean>
-----------------------------------------------------
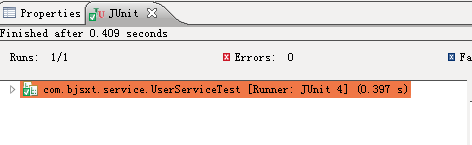
XML和Annotation版本源码全部经Junit测试成功!
⊙_⊙最后,按照我的惯例,附上本次的项目源码三个(XML和Annotation版本,还有补充的@Resource的,源码来自尚学堂马士兵),类库用到三个(spring.jar ?junit.jar(eclipse自带) commons-logging.jar 缺少类库到http://moshowgame.iteye.com/admin/blogs/1606825下载)。
^_^还有什么好方法或者疑问和意见欢迎大家提出来一起讨论!
?