jetty学习总结最近开始选择JETTY作为服务器了,乘这现在空闲点学习了些JETTY的部署知识,原来她真的跟TOMCAT
jetty学习总结
最近开始选择JETTY作为服务器了,乘这现在空闲点学习了些JETTY的部署知识,原来她真的跟TOMCAT很类似,先总结如下:
部署应用方法(下载好jetty);
方法一:
直接将应用的 war包放在jetty_home/webapps下,启动jetty(命令:java -jar start.jar),默认jetty的端口是8080,在IE输入http://localhost:8080/jetty/jsp/login.jsp即可。
方法二(动态部署):
1.拷贝jetty_home/contexts/test.xml到相同目录,更改名称为jetty.xml,修改改xml内容如下(红色标识部分):
?
<?xml version="1.0" ?encoding="ISO-8859-1"?>
<!DOCTYPE Configure PUBLIC "-//Mort Bay Consulting//DTD Configure//EN" "http://jetty.mortbay.org/configure.dtd">
?
<!-- ==================================================================
Configure and deploy the test web application in $(jetty.home)/webapps/test
?
Note. If this file did not exist or used a context path other that /test
then the default configuration of jetty.xml would discover the test
webapplication with a WebAppDeployer. ?By specifying a context in this
directory, additional configuration may be specified and hot deployments?
detected.
===================================================================== -->
?
<Configure default="."/>/webapps/jetty</Set>
?
??<!-- - - - - - - - - - - - - - - - - - - - - - - - - - - - - - - - - -->
??<!-- Optional context configuration ? ? ? ? ? ? ? ? ? ? ? ? ? ? ? ? ?-->
??<!-- - - - - - - - - - - - - - - - - - - - - - - - - - - - - - - - - -->
??<Set name="extractWAR">false</Set>
??<Set name="copyWebDir">false</Set>
??<Set name="defaultsDescriptor"><SystemProperty name="jetty.home" default="."/>/etc/webdefault.xml</Set>
<!-- ?<Set name="overrideDescriptor"><SystemProperty name="jetty.home" default="."/>/contexts/test.d/override-web.xml</Set>-->
?
??<!-- virtual hosts
??<Set name="virtualHosts">
?? ?<Array type="String">
?? ? ?<Item>www.myVirtualDomain.com</Item>
?? ? ?<Item>localhost</Item>
?? ? ?<Item>127.0.0.1</Item>
?? ?</Array>
??</Set>
??-->
?
??<!-- disable cookies?
??<Get name="sessionHandler">
?? ? <Get name="sessionManager">
?? ? ? ?<Set name="usingCookies" type="boolean">false</Set>
?? ? </Get>
??</Get>
??-->
?
??<Get name="securityHandler">
?? ?<Set name="userRealm">
?? ? ?<New default="."/>/etc/realm.properties</Set>
?? ? ? ? ? ?<!-- To enable reload of realm when properties change, uncomment the following lines -->
?? ? ? ? ? ?<!-- changing refreshInterval (in seconds) as desired ? ? ? ? ? ? ? ? ? ? ? ? ? ? ? ?-->
?? ? ? ? ? ?<!--?
?? ? ? ? ? ?<Set name="refreshInterval">5</Set>
?? ? ? ? ? ?<Call name="start"></Call>
?? ? ? ? ? ?-->
?? ? ?</New>
?? ?</Set>
?? ?<Set name="checkWelcomeFiles">true</Set>
??</Get>
?
??<!-- Non standard error page mapping -->
??<!--
??<Get name="errorHandler">
?? ?<Call name="addErrorPage">
?? ? ?<Arg type="int">500</Arg>
?? ? ?<Arg type="int">599</Arg>
?? ? ?<Arg type="String">/dump/errorCodeRangeMapping</Arg>
?? ?</Call>
??</Get>
??-->
?
</Configure>
2.将应用的war文件解压到jetty_home/webapps下(与配置文件jetty.xml中的<Set name="war">设置的路径匹配)
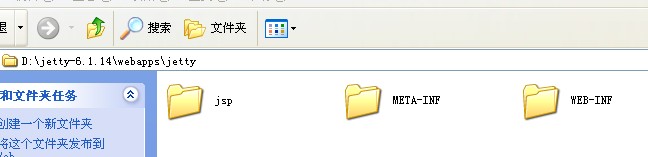
?之后启动jetty即可完成部署。
?
方法三(使用jetty插件,适用于单个工程的应用,且个文件放在maven默认路径):在应用的pom.xml文件中添加jetty插件配置如下;<build>
??? ?? <!-- jetty插件 -->
??? ??? <plugins>
??? ??? ??? <plugin>
??? ??? ??? ??? <groupId>org.mortbay.jetty</groupId>
??? ??? ??? ??? <artifactId>maven-jetty-plugin</artifactId>
??? ??? ??? ??? <version>6.1.10</version>
??? ??? ??? ??? <configuration>
??? ??? ??? ??? ??? <scanIntervalSeconds>10</scanIntervalSeconds>
??? ??? ??? ??? ??? <stopKey>foo</stopKey>
??? ??? ??? ??? ??? <stopPort>9999</stopPort>
??? ??? ??? ??? </configuration>
??? ??? ??? ??? <executions>
??? ??? ??? ??? ??? <execution>
??? ??? ??? ??? ??? ??? <id>start-jetty</id>
??? ??? ??? ??? ??? ??? <phase>pre-integration-test</phase>
??? ??? ??? ??? ??? ??? <goals>
??? ??? ??? ??? ??? ??? ??? <goal>run</goal>
??? ??? ??? ??? ??? ??? </goals>
??? ??? ??? ??? ??? ??? <configuration>
??? ??? ??? ??? ??? ??? ??? <scanIntervalSeconds>0</scanIntervalSeconds>
??? ??? ??? ??? ??? ??? ??? <daemon>true</daemon>
??? ??? ??? ??? ??? ??? </configuration>
??? ??? ??? ??? ??? </execution>
??? ??? ??? ??? ??? <execution>
??? ??? ??? ??? ??? ??? <id>stop-jetty</id>
??? ??? ??? ??? ??? ??? <phase>post-integration-test</phase>
??? ??? ??? ??? ??? ??? <goals>
??? ??? ??? ??? ??? ??? ??? <goal>stop</goal>
??? ??? ??? ??? ??? ??? </goals>
??? ??? ??? ??? ??? </execution>
??? ??? ??? ??? </executions>
??? ??? ??? </plugin>
??? ??? </plugins>
??? </build>运行命令:mvn jetty:run 即可启动jetty服务,默认端口是8080,在IE输入http://localhost:8080/jetty/jsp/login.jsp即可。停止服务可直接ctrl+c或者运行mvn jetty:stop即可。开启服务后可以实现热部署功能,修改jsp或java代码均可。
或配置如下:<plugin>? <groupId>org.mortbay.jetty</groupId>? <artifactId>maven-jetty-plugin</artifactId>? <version>6.1.22</version>? <configuration>? <contextPath>/</contextPath>? <connectors>? <connector implementation="org.mortbay.jetty.nio.SelectChannelConnector">? <port>8081</port>? <maxIdleTime>60000</maxIdleTime>? </connector>? </connectors>? <requestLog implementation="org.mortbay.jetty.NCSARequestLog">? <filename>target/access.log</filename>? <retainDays>90</retainDays>? <append>false</append>? <extended>false</extended>? <logTimeZone>GMT+8:00</logTimeZone>? </requestLog>? <systemProperties>? <systemProperty>? <name>productionMode</name>? <value>false</value>? </systemProperty>? </systemProperties>? </configuration>? </plugin>?指定jetty端口为8081,且直接输入http://localhost:8081/jsp/login.jsp?即可
jetty知识:如果启动脚本不在jetty目录下,则需执行如下命令启动jetty;D:\>"D:/Program Files/Java/jdk1.6.0_20\bin\java" -jar d:/jetty-distribution-7.4.2.v20110526/start.jar --ini=d:/jetty-distribution-7.4.2.v20110526/start.ini -Djetty.home=d:/jetty-distribution-7.4.2.v20110526
如果启动脚本在jetty目录下则只需:java -jar start.jar
-------------------------------------------------利用macen的jetty插件调试工程:在pom中添加jetty插件:<build>? ? ?<plugins> <plugin> ? ? ? ?<groupId>org.mortbay.jetty</groupId> ? ? ? ?<artifactId>maven-jetty-plugin</artifactId> ? ? ? ?<version>6.1.9</version> ? ? ? ?<configuration> ? ? <contextPath>/</contextPath> ? ? ?<scanIntervalSeconds>3</scanIntervalSeconds> ? ? ?<scanTargetPatterns> <scanTargetPattern> ? ? ? ?<directory>src/main/webapp</directory> </scanTargetPattern> ? ? ? </scanTargetPatterns> ? ? ? </configuration>? ? ? ? ? ? ? </plugin>? ? ?</plugins>? </build>1、先来配置一个外部工具,来运行JETTY:
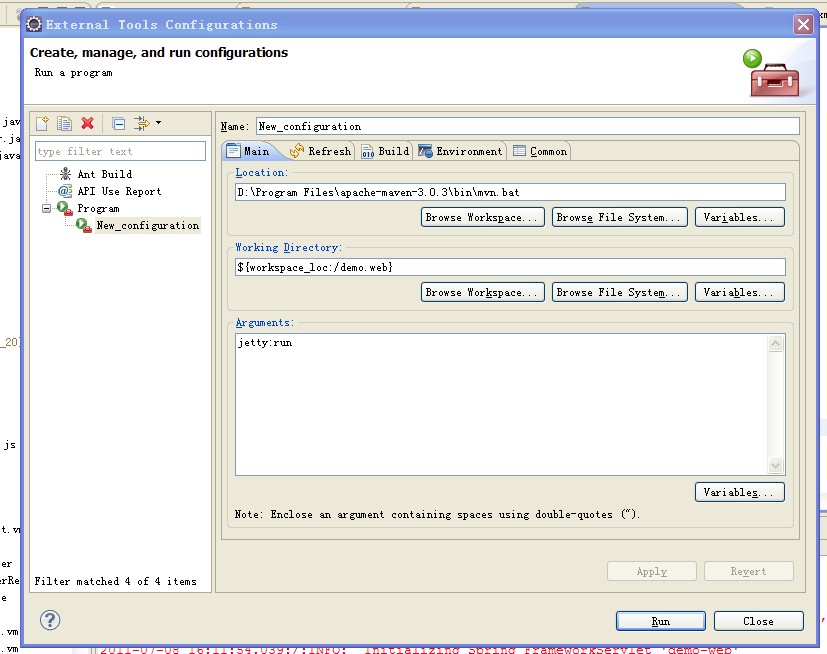
选择菜单Run->External Tools->External Tools Configurations ...在左边选择Program,再点New:
配置Location为mvn完整命令行。定位到bin下的mvn.bat
选择Working Directory为本项目。
Arguments填写:jetty:run
?
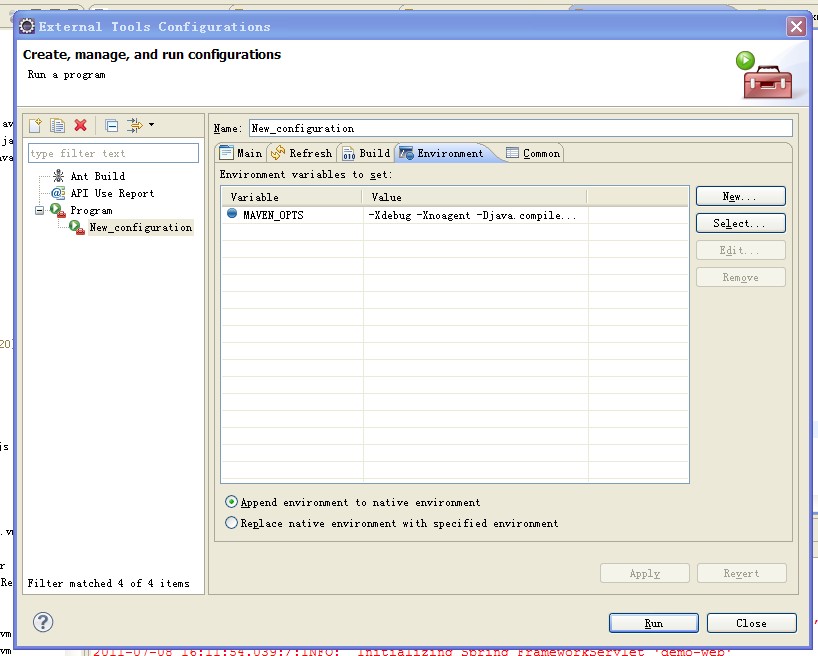
再点选Enviroment页:加入MAVEN_OPTS变量,值为:
-Xdebug -Xnoagent -Djava.compiler=NONE -Xrunjdwp:transport=dt_socket,address=8088,server=y,suspend=y
其中,如果suspend=n 表示不调试,直接运行。address=8080为端口
然后,点APPLY,再点run已启动jetty.
?
另外注意一点,好像external tool菜单项在java browering的perspective下才会出现。如果在java下看不见,可以切换下试试。
2、调试应用
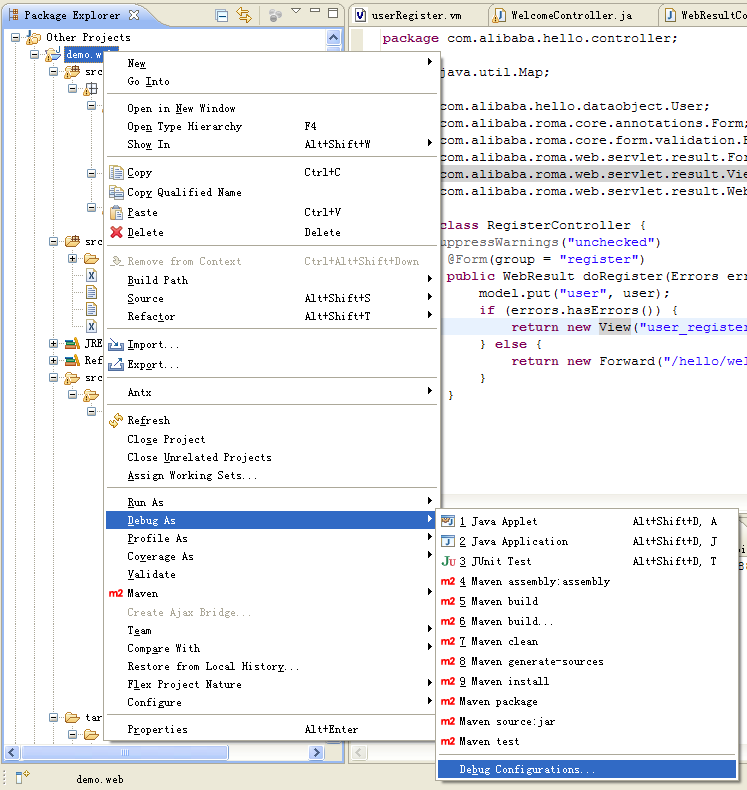
右键点击工程,选debug as ->debug configurations...
?
选中左树中的Remote Java Application,再点New。
选择你的项目,关键是要填和之前设置外部工具时相同的端口号。
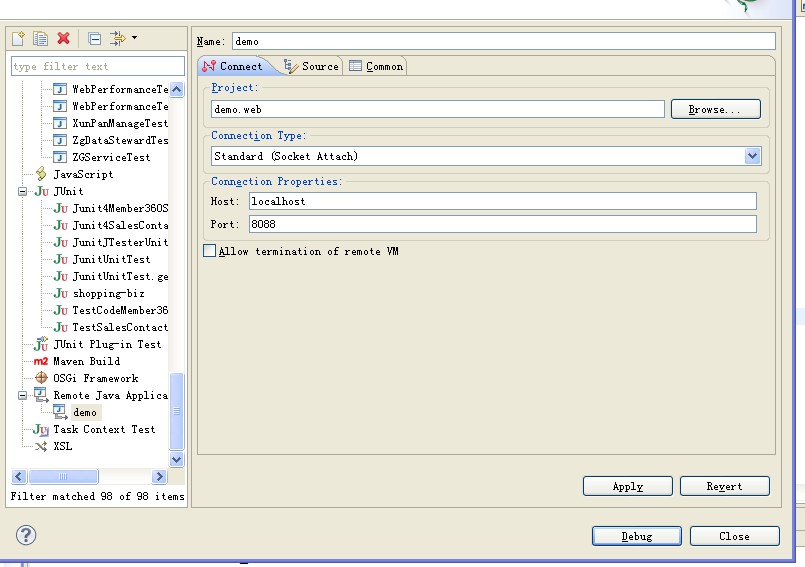
?点击apply,再点击degug即可。


