Spring 引语学习手札(三) 表单页面处理
Spring 注解学习手札(三) 表单页面处理昨天小歇一天,看着两篇博客迅速飙升的点击率,十分欣慰。今天来研究一
Spring 注解学习手札(三) 表单页面处理
昨天小歇一天,看着两篇博客迅速飙升的点击率,十分欣慰。今天来研究一下表单页面的处理问题。
相关参考:
Spring 注解学习手札(一) 构建简单Web应用
Spring 注解学习手札(二) 控制层梳理
Spring 注解学习手札(三) 表单页面处理
Spring 注解学习手札(四) 持久层浅析
Spring 注解学习手札(五) 业务层事务处理
Spring 注解学习手札(六) 测试
如果要说表单,最简单的就是用户登录页面了!估计大多数做B/S出身的兄弟可能写的第一个表单就是登录表单了! 今天,我也不例外,做一个登录验证实现!
首先,改造一下账户类Account,增加一个id字段:
Account.java
/** * 2010-1-23 */package org.zlex.spring.domain;import java.io.Serializable;/** * 账户 * * @author <a href="mailto:zlex.dongliang@gmail.com">梁栋</a> * @version 1.0 * @since 1.0 */public class Account implements Serializable {/** * */private static final long serialVersionUID = -533698031946372178L;/** * 主键 */private int id;/** * 用户名 */private String username;/** * 密码 */private String password;public Account() {}/** * @param id */public Account(int id) {this.id = id;} // get、set方法省略}
接下来,为了协调逻辑处理,我们改造接口AccountService及其实现类AccountServiceImpl:
AccountService.java
/** * 2010-1-23 */package org.zlex.spring.service;import org.springframework.transaction.annotation.Transactional;import org.zlex.spring.domain.Account;/** * 账户业务接口 * * @author <a href="mailto:zlex.dongliang@gmail.com">梁栋</a> * @version 1.0 * @since 1.0 */@Transactionalpublic interface AccountService {/** * 获得账户 * * @param username * @param password * @return */Account read(String username, String password);/** * 获得账户 * * @param id * @return */Account read(int id);}
我们暂时抛开AccountDao该做的事情,在AccountServiceImpl中完成数据提取:
AccountServiceImpl.java
/** * 2010-1-23 */package org.zlex.spring.service.impl;import org.springframework.beans.factory.annotation.Autowired;import org.springframework.stereotype.Service;import org.zlex.spring.dao.AccountDao;import org.zlex.spring.domain.Account;import org.zlex.spring.service.AccountService;/** * 账户业务 * * @author <a href="mailto:zlex.dongliang@gmail.com">梁栋</a> * @version 1.0 * @since 1.0 */@Servicepublic class AccountServiceImpl implements AccountService {@Autowiredprivate AccountDao accountDao;@Overridepublic Account read(String username, String password) {Account account = null;if (username.equals("snowolf") && password.equals("zlex")) {account = new Account();account.setId(1);account.setUsername(username);account.setPassword(password);}return account;}@Overridepublic Account read(int id) {Account account = new Account();account.setId(1);account.setUsername("snowolf");account.setPassword("zlex");return account;}}
先来一个账户信息的展示,构建一个控制器ProfileController:
ProfileController.java
/** * 2010-1-26 */package org.zlex.spring.controller;import org.springframework.beans.factory.annotation.Autowired;import org.springframework.stereotype.Controller;import org.springframework.ui.ModelMap;import org.springframework.web.bind.annotation.RequestMapping;import org.springframework.web.bind.annotation.RequestMethod;import org.springframework.web.bind.annotation.RequestParam; import org.zlex.spring.domain.Account;import org.zlex.spring.service.AccountService;/** * 账户信息控制器 * * @author <a href="mailto:zlex.dongliang@gmail.com">梁栋</a> * @version 1.0 * @since 1.0 */@Controller@RequestMapping(value = "/profile.do")public class ProfileController {@Autowiredprivate AccountService accountService;/** * 账户信息展示 * * @param id * @param model * @return */@RequestMapping(method = RequestMethod.GET)public String profile(@RequestParam("id") int id, ModelMap model) {Account account = accountService.read(id);model.addAttribute("account", account);// 跳转到用户信息页面return "account/profile";}}
@RequestMapping(value = "/profile.do")为该控制器绑定url(/profile.do)
@RequestMapping(method = RequestMethod.GET)指定为GET请求
model.addAttribute("account", account);绑定账户
return "account/profile";跳转到“/WEB-INF/page/account/porfile.jsp”页面
对应构建这个页面:
porfile.jsp
<fieldset><legend>用户信息</legend><ul><li><label>用户名:</label><c:out value="${account.username}" /></li></ul></fieldset>
账户信息已经绑定在response的属性上。自然,使用<c:out />标签就可以获得账户信息内容。
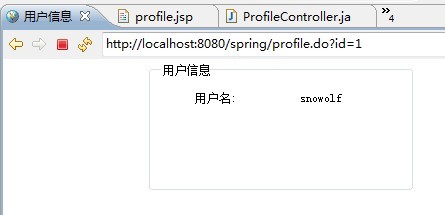
访问地址http://localhost:8080/spring/profile.do?id=1,结果如图所示:
接着构建一个登录控制器LoginController
LoginController.java
/** * 2010-1-25 */package org.zlex.spring.controller;import org.springframework.beans.factory.annotation.Autowired;import org.springframework.stereotype.Controller;import org.springframework.ui.ModelMap;import org.springframework.web.bind.annotation.ModelAttribute;import org.springframework.web.bind.annotation.RequestMapping;import org.springframework.web.bind.annotation.RequestMethod;import org.zlex.spring.domain.Account;import org.zlex.spring.service.AccountService;/** * 登录控制器 * * @author <a href="mailto:zlex.dongliang@gmail.com">梁栋</a> * @version 1.0 * @since 1.0 */@Controller@RequestMapping(value = "/login.do")public class LoginController {@Autowiredprivate AccountService accountService;/** * 初始化表单 * * @param model * @return */@RequestMapping(method = RequestMethod.GET)public String initForm(ModelMap model) {Account account = new Account();model.addAttribute("account", account);// 直接跳转到登录页面return "account/login";}/** * 登录 * * @param account * @return */@RequestMapping(method = RequestMethod.POST)public String login(@ModelAttribute("account") Account account) {Account acc = accountService.read(account.getUsername(), account.getPassword());if (acc != null) {return "redirect:profile.do?id=" + acc.getId();} else {return "redirect:login.do";}}}
分段详述,先说初始化表单:
/** * 初始化表单 * * @param model * @return */@RequestMapping(method = RequestMethod.GET)public String initForm(ModelMap model) {Account account = new Account();model.addAttribute("account", account);// 直接跳转到登录页面return "account/login";}
@RequestMapping(method = RequestMethod.GET)指定了GET请求方式,这与POST表单提交相对应!
model.addAttribute("account", account);绑定账户对象,也就是这个登录表单对象
return "account/login";指向登录页面
再看登录方法:
/** * 登录 * * @param account * @return */@RequestMapping(method = RequestMethod.POST)public String login(@ModelAttribute("account") Account account) {Account acc = accountService.read(account.getUsername(), account.getPassword());if (acc != null) {return "redirect:profile.do?id=" + acc.getId();} else {return "redirect:login.do";}}
@RequestMapping(method = RequestMethod.POST)绑定POST表单提交请求
@ModelAttribute("account") Account account绑定表单对象。
最后,再来看看页面:
login.jsp
<fieldset><legend>登录</legend><form:form commandName="account"><form:hidden path="id" /><ul><li><form:label path="username">用户名:</form:label><form:inputpath="username" /></li><li><form:label path="password">密码:</form:label><form:passwordpath="password" /></li><li><button type="submit">登录</button><button type="reset">重置</button></li></ul></form:form></fieldset>
注意,<form:form commandName="account">必须指明commandName,且与表单初始化、提交方法中的表单对象名称保持一致!
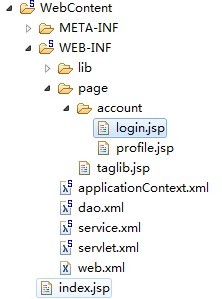
页面目录结构如下图所示:
在页面中,我加入了一部分css效果,这部分代码我就不在这里唠叨了,大家可以看源码!
登录试试,如图:
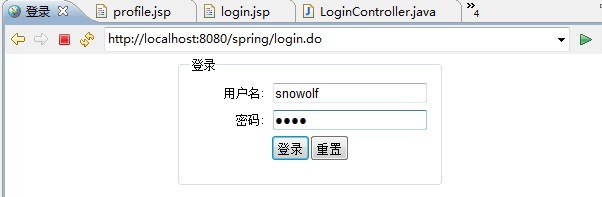
用户名:snwolf 密码:zlex
如果登录成功,我们就会跳转到之前的账户信息页面!
注解的确减少了代码的开发量,当然,这对于我们理解程序是一种挑战!如果你不知道原有的SpringMVC的流程,很难一开始就能摆弄清楚这些内容!


