
Android LayoutInflater的使用Android LayoutInflater的使用,在实际开发中LayoutInflater这个类还是非常有
Android LayoutInflater的使用
Android LayoutInflater的使用,在实际开发中LayoutInflater这个类还是非常有用的,它的作用类似于findViewById(),不同的是LayoutInflater是用来找layout下xml布局文件,并且实例化!而findViewById()是找具体xml下的具体widget控件(如:Button,TextView等)。
为了让大家更容易理解我做了一个简单的Demo,主布局main.xml里有一个TextView和一个Button,当点击Button,出现Dialog,而这个Dialog的布局方式是我们在layout目录下定义的custom_dialog.xml文件(里面左右分布,左边ImageView,右边TextView)。
效果图如下:
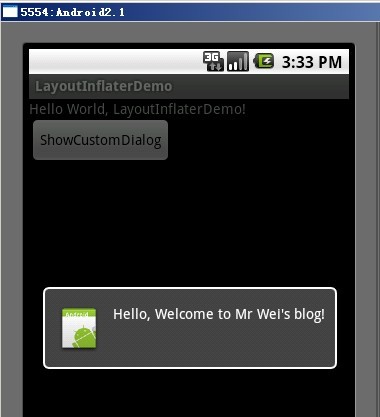
下面我将详细的说明Demo的实现过程:
1、新建一个Android工程,我们命名为LayoutInflaterDemo.
2、修改main.xml布局,里面主要在原来基础上增加了一个Button.代码如下:
<?xml version="1.0" encoding="utf-8"?><LinearLayout xmlns:android="http://schemas.android.com/apk/res/android" android:orientation="vertical" android:layout_width="fill_parent" android:layout_height="fill_parent"> <TextView android:layout_width="fill_parent" android:layout_height="wrap_content" android:text="@string/hello" /> <Button android:id="@+id/button" android:layout_width="wrap_content" android:layout_height="wrap_content" android:text="ShowCustomDialog" /></LinearLayout>
?3、定义对话框的布局方式,我们在layout目录下,新建一个名为custom_dialog.xml文件,具体代码如下:
<?xml version="1.0" encoding="utf-8"?><LinearLayout xmlns:android="http://schemas.android.com/apk/res/android" android:orientation="horizontal" android:layout_width="fill_parent" android:layout_height="fill_parent" android:padding="10dp"> <ImageView android:id="@+id/image" android:layout_width="wrap_content" android:layout_height="fill_parent" android:layout_marginRight="10dp" /> <TextView android:id="@+id/text" android:layout_width="wrap_content" android:layout_height="fill_parent" android:textColor="#FFF" /></LinearLayout>
?4、修改主程序LayouInflaterDemo.java代码如下:
package com.android.tutor; import android.app.Activity;import android.app.AlertDialog;import android.content.Context;import android.os.Bundle;import android.view.LayoutInflater;import android.view.View;import android.view.View.OnClickListener;import android.widget.Button;import android.widget.ImageView;import android.widget.TextView; public class LayoutInflaterDemo extends Activity implements OnClickListener { private Button button; public void onCreate(Bundle savedInstanceState) { super.onCreate(savedInstanceState); setContentView(R.layout.main); button = (Button) findViewById(R.id.button); button.setOnClickListener(this); } @Override public void onClick(View v) { showCustomDialog(); } public void showCustomDialog() { AlertDialog.Builder builder; AlertDialog alertDialog; Context mContext = LayoutInflaterDemo.this; // 下面俩种方法都可以 // //LayoutInflater inflater = getLayoutInflater(); LayoutInflater inflater = (LayoutInflater) mContext .getSystemService(LAYOUT_INFLATER_SERVICE); View layout = inflater.inflate(R.layout.custom_dialog, null); TextView text = (TextView) layout.findViewById(R.id.text); text.setText("Hello, Welcome to Mr Wei's blog!"); ImageView image = (ImageView) layout.findViewById(R.id.image); image.setImageResource(R.drawable.icon); builder = new AlertDialog.Builder(mContext); builder.setView(layout); alertDialog = builder.create(); alertDialog.show(); }}?5、最后执行,点击Button,将得到上述效果。