smartrcp开源平台使用Java与Flex构建桌面程序 二(快速搭建程序整体布局)
本篇是 smartrcp开源平台AIR的掘墓人一(smartrcp版hello world) 的继续。
?
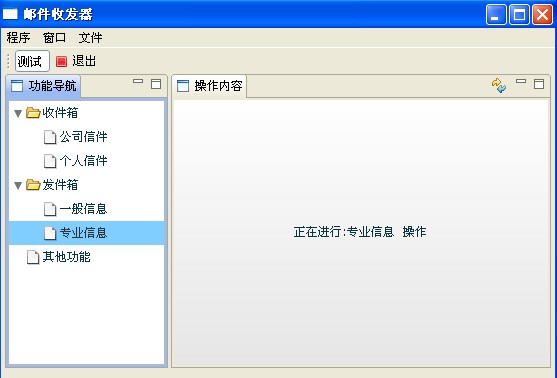
仅仅是弹出一个窗口没多大意思,接下来让我们通过简单的几句代码快速搭建出像eclipse那样成熟的软件界面。
效果如下图:
????? 
基本步骤如下:
1:smartrcpDemo项目的src目录下新建modules目录,并在该目录下
?? 新建两个名称分别为Module_Content.mxml和Module_Nav.mxml的mxml module文件,注意在New mxml module
?? 对话框的Module SWF size部分选中Optimize for application 为Test.mxml文件,这样会减小编译出的模块文件
?? 的大小,至于什么原因,大家查查flex基础吧^_^。
??
?? 修改量文件内容分别如下:
??
?? Module_Content.mxml文件内容:
<?xml version="1.0" encoding="utf-8"?><rcp:RCPModule xmlns:mx="http://www.adobe.com/2006/mxml"xmlns:rcp="http://www.smartrcp.org" layout="vertical" verticalAlign="middle" horizontalAlign="center" creationComplete="init()" > <mx:Script> <![CDATA[ import mx.controls.Alert; import cn.smartinvoke.smartrcp.gui.control.CActionManager; import cn.smartinvoke.smartrcp.gui.module.CActionEvent; import mx.collections.ArrayCollection; import cn.smartinvoke.rcp.CToolBar; import cn.smartinvoke.smartrcp.gui.FlashViewPart; import cn.smartinvoke.RemoteObject; import cn.smartinvoke.smartrcp.gui.ViewPartActionBar; var actionBar:ViewPartActionBar=null; //初始化方法,在该方法中为当前视图添加一刷新按钮 function init():void{ /**在容器上添加刷新按钮*/ var parent:RemoteObject=this.flashViewer.getParent();//如果存载当前flash的容器时viewPart,才具有此功能if(parent is FlashViewPart){ var viewPart:FlashViewPart=parent as FlashViewPart; //获得当前视图容器的工具栏容器对象 this.actionBar=viewPart.getPartActionBar(); //注册freshAction到工具栏容器对象actionBar this.actionBar.addAction(this.freshAction); //定义工具栏对象 var toolBar:CToolBar=new CToolBar(); //将freshAction 添加到该工具栏对象 toolBar.actionIds=new ArrayCollection([this.freshAction.actionId]); //将工具栏对象添加到工具栏容器 this.actionBar.fillToolBar(toolBar); //给freshAction 添加事件监听器 this.actionBar.addListener(this.freshAction.actionId,function (ret:CActionEvent):void{ this.setInfo("刷新当前的所有操作.............."); },this);}/**添加对Splash.mxml启动文件中定义的id为test的全局action的事件监听*/CActionManager.Instance.addListener("test",function (evt:CActionEvent):void{Alert.show("id为test的全局action被用户点击触发了");},this); } //公共方法,该方法可以被其他模块调用 public function setInfo(info:String):void{ this.labelInfo.text=info; } ]]> </mx:Script> <!--定义一action --> <rcp:CAction id="freshAction" actionId="actionfresh" imageUrl="icons/update.gif" text="刷新" toolTip="刷新当前视图"/> <mx:Label id="labelInfo" text="欢迎使用......"/></rcp:RCPModule>?
?Module_Nav.mxml文件内容如下:
?
?
<?xml version="1.0" encoding="utf-8"?><rcp:RCPModule xmlns:mx="http://www.adobe.com/2006/mxml"xmlns:rcp="http://www.smartrcp.org" layout="vertical" creationComplete="init()"> <mx:Script> <![CDATA[ import cn.smartinvoke.smartrcp.gui.module.CEvent; import org.eclipse.swt.SWT; import org.eclipse.swt.widgets.Display; import mx.collections.ArrayCollection; import cn.smartinvoke.smartrcp.gui.control.CAppToolBarManager; import cn.smartinvoke.smartrcp.CApplication; import mx.controls.Alert; import cn.smartinvoke.smartrcp.gui.module.CActionEvent; import cn.smartinvoke.smartrcp.gui.control.CActionManager; import cn.smartinvoke.rcp.CAction; import mx.events.ListEvent; import mx.events.ItemClickEvent; import cn.smartinvoke.smartrcp.gui.control.ViewManager; import cn.smartinvoke.smartrcp.gui.FlashViewer; //初始化方法 function init():void{ /**在工具栏上添加退出按钮*/ //首先定义action,这里的action与jface中的action作用相同,表示一个动作,它可以被添加到菜单与工具栏 var action:CAction=new CAction("action_exist","退出","icons/exist.gif","点击退出系统"); //添加到应用程序action管理器 CActionManager.Instance.addAction(action); //添加action监听函数,当action 被触发时,会调用此监听函数 CActionManager.Instance.addListener(action.actionId,function (evt:CActionEvent):void{ //调用CApplication对象退出系统 CApplication.Instance.exit(); },this); //将该action添加到工具栏 CAppToolBarManager.Instance.insertItem(action.actionId); /**添加快捷键监听功能*/ Display.getCurrent().addListener(SWT.KeyDown,function (evt:CEvent):void{ if(evt.stateMask==(SWT.CTRL | SWT.ALT)&& evt.keyCode==SWT.F1){ Alert.show("ctrl + alt + F1 被按下了"); } },this); } public function onItemClick(event:ListEvent):void { //返回当前运行的所有Module_Content.mxml模块实例集合 var flashViewers:ArrayCollection= ViewManager.Instance.findFlashViewers("modules/Module_Content.swf"); //获得第一个实例 var flashViewer:FlashViewer=flashViewers[0] as FlashViewer; //获得用户当前选择的操作名称 var selectedNode:XML=Tree(event.target).selectedItem as XML; var info:String="正在进行:"+selectedNode.@label+" 操作"; //调用Module_Content.mxml模块中的setInfo方法,并传入info字符串,显示用户当前的操作 flashViewer.invoke("setInfo",[info]); } ]]> </mx:Script><mx:XMLList id="treeData"> <node label="邮箱"> <node label="收件箱"> <node label="公司信件"/> <node label="个人信件"/> </node> <node label="发件箱"> <node label="一般信息"/> <node label="专业信息"/> </node> <node label="其他功能"/> </node> </mx:XMLList> <mx:Tree id="myTree" width="100%" height="100%" labelField="@label" showRoot="false" dataProvider="{treeData}" itemClick="onItemClick(event)"/> </rcp:RCPModule>?分别编译两模块文件后,你会发现在smartrcpDemo项目的bin-debug目录下新增了modules目录,该目录中
有Module_Content.swf和Module_Nav.swf两个文件,他们即为前两个mxml 模块文件编译出的文件。
?
2:修改Test.mxml文件内容如下:
?
?
<?xml version="1.0" encoding="utf-8"?><rcp:RCPApplication xmlns:mx="http://www.adobe.com/2006/mxml" xmlns:rcp="http://www.smartrcp.org" backgroundColor="white" layout="vertical" verticalAlign="middle" paddingLeft="0" paddingRight="0" paddingBottom="0" paddingTop="0" > <mx:Style> global{ font-size:12px; } </mx:Style></rcp:RCPApplication>?
保存并编译该Test.mxml文件。
3:在smartrcpDemo目录下新建名为Splash.mxml的mxml Application文件,内容如下:
?
?
<?xml version="1.0" encoding="utf-8"?><rcp:SplashApp xmlns:mx="http://www.adobe.com/2006/mxml" backgroundColor="#ffffff" xmlns:rcp="http://www.smartrcp.org" paddingBottom="0" paddingLeft="0" paddingRight="0" paddingTop="0" layout="vertical" horizontalAlign="center" verticalAlign="middle" width="353" height="264"> <mx:Style> global{ font-size:12px; } </mx:Style> <mx:Script> <![CDATA[ import cn.smartinvoke.rcp.CLayoutBasicInfo; import mx.controls.Alert; import mx.utils.StringUtil; import cn.smartinvoke.smartrcp.CApplication; import cn.smartinvoke.smartrcp.util.CWorkbenchActions; import cn.smartinvoke.rcp.CPageLayout; import cn.smartinvoke.rcp.CStandaloneLayout; import cn.smartinvoke.rcp.CToolBar; import org.eclipse.swt.SWT; import cn.smartinvoke.rcp.CFolderLayout; /** *平台会自动调用此方法获得整个程序的界面布局对象CPerspective */ public override function getPerspective():CPerspective{ return ret; } //-------- ]]> </mx:Script> <!--SmartRCP程序的整体布局由这里的CPerspective类型对象定义 --><rcp:CPerspective id="ret" runtimeSwfPath="Test.swf"><!--全局action的定义 这里定义的action会自动添加到CActionManager集合中,以便其他模块的调用 --> <rcp:actions> <!--CAction类的作用与Jface中的Action类的作用类似,属性也是相对应的, 每个CAction类型对象会被SmartRCP转换为对应的Action对象。 CWorkbenchActions类全部定义的常量,该类与eclipse rcp 中的ActionFactory 类相对应,表示为eclipse rcp中内置的IWorkbenchAction。 比如这里的第一个CAction定义的作用与rcp程序中ApplicationActionBarAdvisor类的makeActions方法的Java代码: IWorkbenchAction exitAction = ActionFactory.QUIT.create(window); 的作用相同。 --> <rcp:CAction actionId="{CWorkbenchActions.QUIT}" text="退出"/> <rcp:CAction actionId="{CWorkbenchActions.PREFERENCES}" text="设置"/> <rcp:CAction actionId="test" type="{CAction.AS_CHECK_BOX}" checked="true" text="测试" toolTip="toolTipTest..."/> </rcp:actions> <!--菜单栏 通过引用前面定义的全局action的引用id即对象的 actionId属性 来定义SmartRCP程序的菜单栏 --> <rcp:menuBars> <rcp:CMenuRelation label="程序"><!--定义菜单 --> <rcp:actions> <!-- CWorkbenchActions.ID_QUIT在这里引用前面actionId属性为CWorkbenchActions.QUIT的退出Action --> <mx:String>{CWorkbenchActions.ID_QUIT}</mx:String><!--添加菜单项--> </rcp:actions> </rcp:CMenuRelation> <rcp:CMenuRelation label="窗口"> <rcp:actions> <mx:String>{CWorkbenchActions.ID_PREFERENCES}</mx:String> </rcp:actions> </rcp:CMenuRelation> <rcp:CMenuRelation label="文件"> <rcp:actions> <!-- test在这里引用前面actionId属性为test的全局action --> <mx:String>test</mx:String> </rcp:actions> </rcp:CMenuRelation> </rcp:menuBars> <!--工具栏 通过引用前面定义的全局action的引用id即对象的 actionId属性 来定义这里的工具栏按钮 --> <rcp:toolBar> <!--CToolBar.Image_Text_Horizontal将当前程序的工具栏设置为图标加文字的形式 --> <rcp:CToolBar type="{CToolBar.Image_Text_Horizontal}"> <rcp:actionIds> <mx:ArrayCollection> <!-- test在这里引用前面actionId属性为test的全局action --> <mx:String>test</mx:String> </mx:ArrayCollection> </rcp:actionIds> </rcp:CToolBar> </rcp:toolBar> <rcp:windowConfigurer> <!-- 在这里设置SmartRCP程序主窗口的大小,图标,标题,是否显示状态栏等--> <rcp:CWindowConfigurer shellWidth="800" shellHeight="600" showMenuBar="true" showCoolBar="true" showPerspectiveBar="false" showStatusLine="true" shellTitle="邮件收发器" /> </rcp:windowConfigurer> <rcp:page> <!--定义视图布局,CPageLayout类的属性在rcp透视图创建的时候调用, 作用为定义各个模块在整个界面布局中的位置,其属性与rcp中的org.eclipse.ui.IPageLayout类的属性对应 --> <rcp:CPageLayout id="page" editorAreaVisible="false" fixed="false"> <!--视图集合,该集合中定义的视图对象会被转换成对应的ViewPart实例显示于rcp的透视图上 --> <rcp:layouts> <mx:ArrayCollection> <!--定义一个视图布局对象--> <rcp:CFolderLayout id="layoutNav" relationship="{CPageLayout.LEFT}" refLayout="{page}" ratio=".7"> <rcp:modules> <mx:ArrayCollection><!--将导航模块Module_Nav添加到该布局中--> <rcp:CLayoutBasicInfo modulePath="modules/Module_Nav.swf" title="功能导航" closeable="false"/> </mx:ArrayCollection> </rcp:modules> </rcp:CFolderLayout> <!--定义一个操作内容布局对象--> <rcp:CFolderLayout refLayout="{layoutNav}" relationship="{CPageLayout.RIGHT}" ratio=".3"> <rcp:modules> <mx:ArrayCollection><!--将内容模块Module_Content添加到该布局中--> <rcp:CLayoutBasicInfo modulePath="modules/Module_Content.swf" title="操作内容" closeable="false"/> </mx:ArrayCollection> </rcp:modules> </rcp:CFolderLayout> </mx:ArrayCollection> </rcp:layouts> </rcp:CPageLayout> </rcp:page></rcp:CPerspective><!--在这里可以定义启动界面的现实--><mx:Label text="smartrcp测试..." fontSize="23" fontWeight="bold" width="172"/></rcp:SplashApp>?
保存并编译该文件。
4:启动cmd控制台,将当前目录切换到smartrcp的解压目录运行
?? smartrcp.exe -app E:\flexWork\SmartRCPDemo\bin-debug\Splash.swf 命令
???
? -app 参数定义运行时加载的smartrcp程序的启动文件的路径,这里为smartrcpDemo程序中的Splash.mxml文件
? 编译后得到的Splash.swf文件
看到效果了吧使用smartrcp构建桌面程序是不是很简单呀。
代码能说明一切,通过这几句简短的代码就构建出一个程序整体的框架了,这充分说明smartrcp的简洁高效。
我会在此系列的第三篇中介绍smartrcp的菜单和工具栏部分
不过代码转化器最近正在开发,还需要一段时间的