Spring基于注解的缓存配置--web应用实例
之前为大家介绍了如何使用spring注解来进行缓存配置 (EHCache 和 OSCache)的简单的例子,详见
Spring基于注解的缓存配置--EHCache?AND OSCache
?
现在介绍一下如何在基于注解springMVC的web应用中使用注解缓存,其实很简单,就是将springMVC配置文件与缓存注解文件一起声明到context中就OK了。
?
下面我就来构建一个基于spring注解小型的web应用,这里我使用EHCache来作为缓存方案。
?
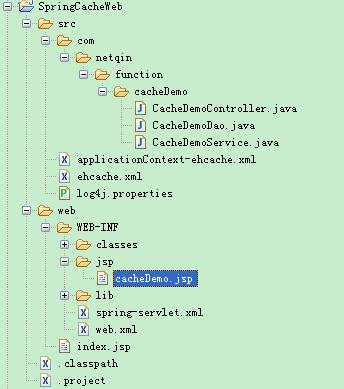
首先来看一下目录结构,如下:
?
?
jar依赖:
ehcache-core-1.7.2.jar
jakarta-oro-2.0.8.jar
slf4j-api-1.5.8.jar
slf4j-jdk14-1.5.8.jar?
cglib-nodep-2.1_3.jar
commons-logging.jar
log4j-1.2.15.jar
spring-modules-cache.jar
spring.jar?
jstl.jar
standard.jar?
?
接着我们来编写web.xml
<?xml version="1.0" encoding="UTF-8"?><web-app xmlns="http://java.sun.com/xml/ns/j2ee" xmlns:xsi="http://www.w3.org/2001/XMLSchema-instance"id="WebApp_ID" version="2.4"xsi:schemaLocation="http://java.sun.com/xml/ns/j2ee http://java.sun.com/xml/ns/j2ee/web-app_2_4.xsd"><display-name>SpringCacheWeb</display-name><!-- 由spring加载log4j --><context-param><param-name>log4jConfigLocation</param-name><param-value>classpath:log4j.properties</param-value></context-param><!-- 声明spring配置文件 --><context-param><param-name>contextConfigLocation</param-name><param-value>/WEB-INF/spring-servlet.xml</param-value></context-param><!-- 使用UTF-8编码 --><filter><filter-name>Set Character Encoding</filter-name><filter-class>org.springframework.web.filter.CharacterEncodingFilter</filter-class><init-param><param-name>encoding</param-name><param-value>UTF-8</param-value></init-param></filter><filter-mapping><filter-name>Set Character Encoding</filter-name><url-pattern>*.do</url-pattern></filter-mapping><!-- 负责初始化log4j--><listener><listener-class>org.springframework.web.util.Log4jConfigListener</listener-class></listener><!-- 负责初始化spring上下文--><listener><listener-class>org.springframework.web.context.ContextLoaderListener</listener-class></listener><!-- springMVC控制器--><servlet><servlet-name>spring</servlet-name><servlet-class>org.springframework.web.servlet.DispatcherServlet</servlet-class><load-on-startup>1</load-on-startup></servlet><servlet-mapping><servlet-name>spring</servlet-name><url-pattern>*.do</url-pattern></servlet-mapping><session-config><session-timeout>10</session-timeout></session-config><welcome-file-list><welcome-file>index.jsp</welcome-file><welcome-file>index.html</welcome-file><welcome-file>index.htm</welcome-file></welcome-file-list></web-app>
?
接着我们来编写spring-servlet.xml
?
<?xml version="1.0" encoding="UTF-8"?><beans xmlns="http://www.springframework.org/schema/beans"xmlns:xsi="http://www.w3.org/2001/XMLSchema-instance" xmlns:context="http://www.springframework.org/schema/context"xmlns:ehcache="http://www.springmodules.org/schema/ehcache"xsi:schemaLocation="http://www.springframework.org/schema/beans http://www.springframework.org/schema/beans/spring-beans-2.5.xsdhttp://www.springframework.org/schema/context http://www.springframework.org/schema/context/spring-context-2.5.xsdhttp://www.springmodules.org/schema/ehcache http://www.springmodules.org/schema/cache/springmodules-ehcache.xsd"default-lazy-init="true"><!--启用注解 定义组件查找规则 --><context:component-scan base-package="com.netqin"><context:include-filter type="annotation"expression="org.springframework.stereotype.Controller" /><context:include-filter type="annotation"expression="org.springframework.stereotype.Service" /><context:include-filter type="annotation"expression="org.springframework.stereotype.Repository" /></context:component-scan><!-- 视图查找器 --><bean id="viewResolver"value="/WEB-INF/jsp/"></property><property name="suffix" value=".jsp"></property></bean><!-- 加载ehcache缓存配置文件 说明:在这里我遇到了这样一个问题,当使用@Service等注解的方式将类声明到配置文件中时,就需要将缓存配置import到主配置文件中,否则缓存会不起作用如果是通过<bean>声明到配置文件中时,则只需要在web.xml的contextConfigLocation中加入applicationContext-ehcache.xml即可,不过还是推荐使用如下方式吧,因为这样不会有任何问题--><import resource="classpath:applicationContext-ehcache.xml"/></beans>
?
ok,我们接着编写applicationContext-ehcache.xml,还记得之前介绍的基于命名空间的配置吗,如下:
<?xml version="1.0" encoding="UTF-8"?><beans xmlns="http://www.springframework.org/schema/beans"xmlns:xsi="http://www.w3.org/2001/XMLSchema-instance" xmlns:ehcache="http://www.springmodules.org/schema/ehcache"xsi:schemaLocation="http://www.springframework.org/schema/beans http://www.springframework.org/schema/beans/spring-beans-2.5.xsdhttp://www.springmodules.org/schema/ehcache http://www.springmodules.org/schema/cache/springmodules-ehcache.xsd"><ehcache:config configLocation="classpath:ehcache.xml"id="cacheProvider" /><ehcache:annotations providerId="cacheProvider"><ehcache:caching cacheName="testCache" id="testCaching" /><ehcache:flushing cacheNames="testCache" id="testFlushing" /></ehcache:annotations></beans>
?
?
ehcache.xml如下:
<?xml version="1.0" encoding="UTF-8"?><ehcache xmlns:xsi="http://www.w3.org/2001/XMLSchema-instance"xsi:noNamespaceSchemaLocation="ehcache.xsd" updateCheck="true"monitoring="autodetect"><diskStore path="java.io.tmpdir"/> <defaultCache maxElementsInMemory="10000" eternal="false" timeToIdleSeconds="120" timeToLiveSeconds="120" overflowToDisk="true" maxElementsOnDisk="10000000" diskPersistent="false" diskExpiryThreadIntervalSeconds="120" memoryStoreEvictionPolicy="LRU" /> <cache name="testCache" maxElementsInMemory="10000" maxElementsOnDisk="1000" eternal="false" overflowToDisk="true" diskSpoolBufferSizeMB="20" timeToIdleSeconds="300" timeToLiveSeconds="600" memoryStoreEvictionPolicy="LFU" /></ehcache>
?
ok,配置文件都完成了,接着我们来编写controller、service和dao
1.CacheDemoController:
package com.netqin.function.cacheDemo;import org.springframework.beans.factory.annotation.Autowired;import org.springframework.stereotype.Controller;import org.springframework.ui.Model;import org.springframework.web.bind.annotation.RequestMapping;@Controllerpublic class CacheDemoController {@Autowiredprivate CacheDemoService service;@RequestMapping("/demo.do")public String handleIndex(Model model) {System.out.println(service.getName(0));model.addAttribute("name", service.getName(0));return "cacheDemo";}@RequestMapping("/demoFulsh.do")?public String handleFulsh(Model model) {??service.flush();??return "cacheDemo";?}}?
2.CacheDemoService :
package com.netqin.function.cacheDemo;import org.springframework.beans.factory.annotation.Autowired;import org.springframework.stereotype.Service;import org.springmodules.cache.annotations.CacheFlush;import org.springmodules.cache.annotations.Cacheable;@Servicepublic class CacheDemoService {@Autowiredprivate CacheDemoDao dao;@Cacheable(modelId = "testCaching")public String getName(int id){System.out.println("Processing testCaching");return dao.getName(id);}@CacheFlush(modelId = "testFlushing")public void flush(){System.out.println("Processing testFlushing");}}??
我们只对service层加入了注解缓存配置。
?
接着我们来写一个简单的页面,cacheDemo.jsp:
<%@ page language="java" contentType="text/html; charset=UTF-8" pageEncoding="UTF-8"%><!DOCTYPE html PUBLIC "-//W3C//DTD HTML 4.01 Transitional//EN" "http://www.w3.org/TR/html4/loose.dtd"><html><head><meta http-equiv="Content-Type" content="text/html; charset=UTF-8"><title>Insert title here</title></head><body>CacheDemo:${name}</body></html>?
ok,一切就绪,我们启动服务器,并访问http://localhost:8080/cache/demo.do
?
多请求几次,请求两次的输出结果:
Processing testCaching
NameId:0
NameId:0
?
说明缓存起作用了,ok!
?
接着我们刷新该缓存,访问http://localhost:8080/cache/demoFulsh.do
再请求http://localhost:8080/cache/demo.do
输出结果:
Processing testCaching
NameId:0
NameId:0
Processing testFlushing
Processing testCaching
NameId:0
?
缓存刷新成功。
?
?
 5 楼 zhangbd_Answer 2012-06-01 后面刷新缓存输出没有看懂,楼主给解释下吧,谢谢。 6 楼 hanqunfeng 2012-06-07 zhangbd_Answer 写道后面刷新缓存输出没有看懂,楼主给解释下吧,谢谢。