DirectX 9.0 C++ 教程 关于Perspective projection,Matrices,摄像头,旋转效果图:对上面这张gif图片是如何
DirectX 9.0 C++ 教程 关于Perspective projection,Matrices,摄像头,旋转
效果图:
对上面这张gif图片是如何制作感兴趣?看截取视频,然后制成gif 教程
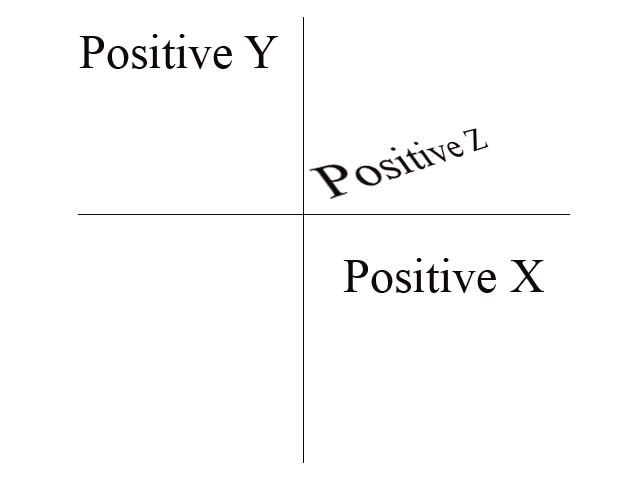
默认情况下,Direct3D使用的是左手坐标系。这意味着虚拟3D网格上的每个正坐标远离观察者的方向。例如,Z轴的正坐标是冲向屏幕里面的,Y轴的正坐标是向上的,而X轴的正坐标是向右的。这里提下OpenGL使用的是右手坐标系,Z轴的正坐标是冲向屏幕外面的。X轴和Y轴是一样的。
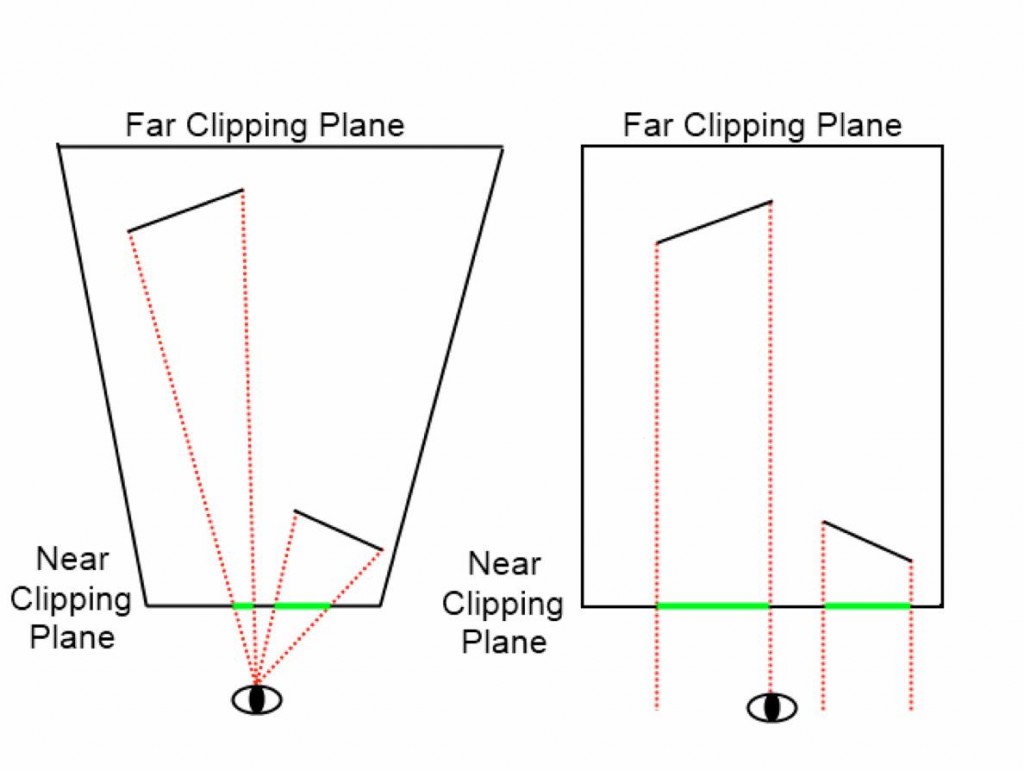
1.透视投射 (perspective projection) ,远处的物体会小些,像我们现实中眼睛看到的样子2.平行投射(parallel projection) 不管物体离摄像机多远,物体大小不变,一般用在2D编程
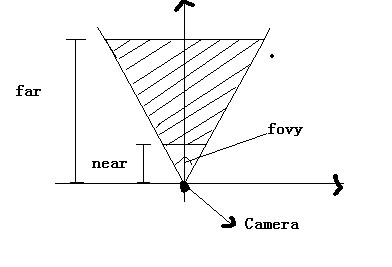
在我们程序中不仅要规定摄像头的位置(就是上图中眼睛的位置),还要规定摄像头看的范围,如果物体在范围之外,会被切割掉。中文叫视锥体,就是下图中阴影部分。看图我们发现要定义3个东西,fovy(用角度),near(到摄像头的最近距离),far(到摄像头最远的距离),还有个纵横比(aspect radio)。
//-----------------------------------------// File: Matrices.cpp//// Desc: Now that we know how to create a device and render some 2D vertices,// this tutorial goes the next step and renders 3D geometry. To deal with// 3D geometry we need to introduce the use of 4x4 Matrices to transform// the geometry with translations, rotations, scaling, and setting up our// camera.//// Geometry is defined in model space. We can move it (translation),// rotate it (rotation), or stretch it (scaling) using a world transform.// The geometry is then said to be in world space. Next, we need to// position the camera, or eye point, somewhere to look at the geometry.// Another transform, via the view matrix, is used, to position and// rotate our view. With the geometry then in view space, our last// transform is the projection transform, which "projects" the 3D scene// into our 2D viewport.//// Note that in this tutorial, we are introducing the use of D3DX, which// is a set of helper utilities for D3D. In this case, we are using some// of D3DX's useful matrix initialization functions. To use D3DX, simply// include <d3dx9.h> and link with d3dx9.lib.//// Copyright (c) Microsoft Corporation. All rights reserved.//-----------------------------------------#include <Windows.h>#include <mmsystem.h>#include <d3dx9.h>#include <strsafe.h>//-----------------------------------------// Global variables//-----------------------------------------LPDIRECT3D9 g_pD3D = NULL; // Used to create the D3DDeviceLPDIRECT3DDEVICE9 g_pd3dDevice = NULL; // Our rendering deviceLPDIRECT3DVERTEXBUFFER9 g_pVB = NULL; // Buffer to hold Vertices// A structure for our custom vertex typestruct CUSTOMVERTEX{ FLOAT x, y, z; // The transformed position for the vertex DWORD color; // The vertex color};// Our custom FVF, which describes our custom vertex structure#define D3DFVF_CUSTOMVERTEX (D3DFVF_XYZ|D3DFVF_DIFFUSE)//#define D3DFVF_CUSTOMVERTEX (D3DFVF_XYZRHW)//-----------------------------------------// Name: InitD3D()// Desc: Initializes Direct3D//-----------------------------------------HRESULT InitD3D( HWND hWnd ){ // Create the D3D object. if( NULL == ( g_pD3D = Direct3DCreate9( D3D_SDK_VERSION ) ) ) return E_FAIL; // Set up the structure used to create the D3DDevice D3DPRESENT_PARAMETERS d3dpp; ZeroMemory( &d3dpp, sizeof(d3dpp) ); d3dpp.Windowed = TRUE; d3dpp.SwapEffect = D3DSWAPEFFECT_DISCARD; d3dpp.BackBufferFormat = D3DFMT_UNKNOWN; // Create the D3DDevice if( FAILED( g_pD3D->CreateDevice( D3DADAPTER_DEFAULT, D3DDEVTYPE_HAL, hWnd, D3DCREATE_SOFTWARE_VERTEXPROCESSING, &d3dpp, &g_pd3dDevice ) ) ) { return E_FAIL; } // Turn off culling, so we see the front and back of the triangle g_pd3dDevice->SetRenderState( D3DRS_CULLMODE, D3DCULL_NONE ); // Turn off D3D lighting, since we are providing our own vertex colors g_pd3dDevice->SetRenderState( D3DRS_LIGHTING, FALSE ); return S_OK;}//-----------------------------------------// Name: InitVB()// Desc: Creates a vertex buffer and fills it with our Vertices. The vertex// buffer is basically just a chuck of memory that holds Vertices. After// creating it, we must Lock()/Unlock() it to fill it. For indices, D3D// also uses index buffers. The special thing about vertex and index// buffers is that they can be created in device memory, allowing some// cards to process them in hardware, resulting in a dramatic// performance gain.//-----------------------------------------HRESULT InitVB(){ // 因为是矩形,所以要定义4个点 CUSTOMVERTEX Vertices[] = { { -1.0f, -1.0f, 0.0f, D3DCOLOR_XRGB(0,255,255), }, // x, y, z, rhw, color { -1.0f, 1.0f, 0.0f, D3DCOLOR_XRGB(255,0,0), }, { 1.0f, -1.0f, 0.0f, D3DCOLOR_XRGB(0,255,0), },{ 1.0f, 1.0f, 0.0f, D3DCOLOR_XRGB(0,0,255), }, }; // Create the vertex buffer. Here we are allocating enough memory // (from the default pool) to hold all our 3 custom Vertices. We also // specify the FVF, so the vertex buffer knows what data it contains. if( FAILED( g_pd3dDevice->CreateVertexBuffer( sizeof(Vertices), 0, D3DFVF_CUSTOMVERTEX, D3DPOOL_DEFAULT, &g_pVB, NULL ) ) ) { return E_FAIL; } // Now we fill the vertex buffer. To do this, we need to Lock() the VB to // gain access to the Vertices. This mechanism is required becuase vertex // buffers may be in device memory. VOID* pVertices; if( FAILED( g_pVB->Lock( 0, sizeof(Vertices), (void**)&pVertices, 0 ) ) ) return E_FAIL; memcpy( pVertices, Vertices, sizeof(Vertices) ); g_pVB->Unlock(); return S_OK;}//-----------------------------------------// Name: Cleanup()// Desc: Releases all previously initialized objects//-----------------------------------------VOID Cleanup(){ if( g_pVB != NULL ) g_pVB->Release(); if( g_pd3dDevice != NULL ) g_pd3dDevice->Release(); if( g_pD3D != NULL ) g_pD3D->Release();}//-----------------------------------------// Name: SetupMatrices()// Desc: Sets up the world, view, and projection transform Matrices.//-----------------------------------------VOID SetupMatrices(){ // For our world matrix, we will just rotate the object about the y-axis. D3DXMATRIXA16 matWorld; // 根据时间,改变角度旋转 UINT iTime = timeGetTime() % 1000; FLOAT fAngle = iTime * (2.0f * D3DX_PI) / 1000.0f; D3DXMatrixRotationY( &matWorld, fAngle); g_pd3dDevice->SetTransform( D3DTS_WORLD, &matWorld ); // 定义摄像头的位置 D3DXVECTOR3 vEyePt(0.0f, 3.0f,-5.0f ); D3DXVECTOR3 vLookatPt( 0.0f, 0.0f, 0.0f ); D3DXVECTOR3 vUpVec( 0.0f, 1.0f, 0.0f ); D3DXMATRIXA16 matView; D3DXMatrixLookAtLH( &matView, &vEyePt, &vLookatPt, &vUpVec ); g_pd3dDevice->SetTransform( D3DTS_VIEW, &matView ); // 定义视锥体的大小 D3DXMATRIXA16 matProj; D3DXMatrixPerspectiveFovLH( &matProj, D3DX_PI/4, 640/480, 1.0f, 100.0f ); g_pd3dDevice->SetTransform( D3DTS_PROJECTION, &matProj );}//-----------------------------------------// Name: Render()// Desc: Draws the scene//-----------------------------------------VOID Render(){ // 黑色 g_pd3dDevice->Clear( 0, NULL, D3DCLEAR_TARGET, D3DCOLOR_XRGB(0,0,0), 1.0f, 0 ); // Begin the scene if( SUCCEEDED( g_pd3dDevice->BeginScene() ) ) { // Setup the world, view, and projection Matrices SetupMatrices(); // Render the vertex buffer contents g_pd3dDevice->SetStreamSource( 0, g_pVB, 0, sizeof(CUSTOMVERTEX) ); g_pd3dDevice->SetFVF( D3DFVF_CUSTOMVERTEX ); g_pd3dDevice->DrawPrimitive( D3DPT_TRIANGLESTRIP, 0, 2 );//因为是矩形,所以是由两个三角形组成 // End the scene g_pd3dDevice->EndScene(); } // Present the backbuffer contents to the display g_pd3dDevice->Present( NULL, NULL, NULL, NULL );}//-----------------------------------------// Name: MsgProc()// Desc: The window's message handler//-----------------------------------------LRESULT WINAPI MsgProc( HWND hWnd, UINT msg, WPARAM wParam, LPARAM lParam ){ switch( msg ) { case WM_DESTROY: Cleanup(); PostQuitMessage( 0 ); return 0; } return DefWindowProc( hWnd, msg, wParam, lParam );}//-----------------------------------------// Name: WinMain()// Desc: The application's entry point//-----------------------------------------INT WINAPI WinMain( HINSTANCE hInst, HINSTANCE, LPSTR, INT ){ // Register the window class WNDCLASSEX wc = { sizeof(WNDCLASSEX), CS_CLASSDC, MsgProc, 0L, 0L, GetModuleHandle(NULL), NULL, NULL, NULL, NULL, "D3D Tutorial", NULL }; RegisterClassEx( &wc ); // Create the application's window HWND hWnd = CreateWindow( "D3D Tutorial", "D3D Tutorial 03: Matrices", WS_OVERLAPPEDWINDOW, 100, 100, 640, 480, GetDesktopWindow(), NULL, wc.hInstance, NULL ); // Initialize Direct3D if( SUCCEEDED( InitD3D( hWnd ) ) ) { // Create the vertex buffer if( SUCCEEDED( InitVB() ) ) { // Show the window ShowWindow( hWnd, SW_SHOWDEFAULT ); UpdateWindow( hWnd ); // Enter the message loop MSG msg; ZeroMemory( &msg, sizeof(msg) ); while( msg.message!=WM_QUIT ) { if( PeekMessage( &msg, NULL, 0U, 0U, PM_REMOVE ) ) { TranslateMessage( &msg ); DispatchMessage( &msg ); } else Render(); } } } UnregisterClass( "D3D Tutorial", wc.hInstance ); return 0;}文章源地址:http://www.waitingfy.com/?p=216
项目下载:http://download.csdn.net/detail/fox64194167/4628069(CSDN下载,免积分)
Matrices (本地下载)
相关文章:
1.DirectX 9.0 C++ 教程 开发环境设定
2.DirectX 9.0 C++ 教程 第一个程序
3.DirectX 9.0 C++ 教程 绘制三角形
4.DirectX 9.0 C++ 教程 关于Perspective projection,Matrices,摄像头,旋转