Force.com 云计算平台 试玩小结(二)
To learn more about Force.com and to access a rich set of resources, visit Developer Force at developer.force.com.
?
Workbook2009.pdf 1-4章要点总结
?
数据库ER图如下: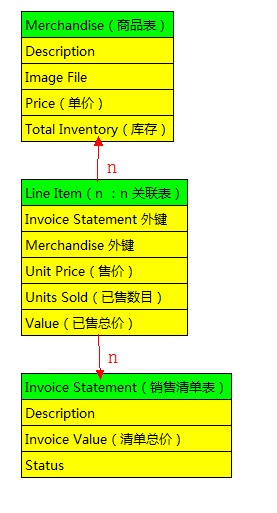
Tutorial #1: Creating a Warehouse Application
Step 1: Create a Merchandise Custom Object
Merchandise detail page —— 在该页面中可以进行一下操作:adding fields, relationships, validation rulesAPIname —— 当你创建完一个Merchandise对象后,你不需要指定一个APIname,已经有一个自动生成了。编程的时候可以使用这个name来引用对象。所有的customobjects都是以__c结尾的,因为这样可以跟standard objects区分开Standard fields —— 一些自动生成的字段。例如Owner字段可以自动跟踪每条记录的创建者Custom fields —— 该name也将以__c结尾
Step 2: Add Description, Price, and Total Inventory Fields
Field Lable可以是使用者看到的,它可以包含一些空格,但是Field Name是代码中使用的,不能包含空格和非法字符,系统会在创建的时候自动使用_(下划线)来替代空格,并且去掉非法字符来创建Field Name
Step 3: Create a Tab
Step 4: Create a Warehouse App
一个application是一些tabs的集合,你可以创建一个Warehouse application,然后往里面添加tab。
Step 5: Create a Merchandise Record
Tutorial #2: Adding Relationships
你可以把 relationship 想象成一个外键。
Step 1: Create an Invoice Statement Custom Object
我们现在把invoice name的数据类型设置为 Auto-Number,并且设置了一个显示格式(“INV-002”)。平台会自动分配一个数字给每一个你创建的唯一的记录。
Step 3: Relate the Objects
n:n的关系的时候,添加一个数据类型为Master-Detail Relationship的字段,再将该字段关联到另一个object
Master-detail relationships也支持roll-up summary fields,你可以从所有的子记录中统计有关信息
Tutorial #3: Using Formulas and Validation Rules
Force.com允许你创建公式和字段验证规则来帮助维护和提高数据的质量。
Step 1: Calculate a Value for Each Line Item
给 line item 表增加了一个总价值Value字段:Unit_Price__c * Units_Sold__c
Step 2: Calculate a Value for the Invoice Statement With a Roll-Up Summary Field
给 invoice statement 表增加一个清单总价值 Invoice Value 字段:SUM line item 的 Value
Step 3: Check Inventory With a Validation Rule
Step 5: Improve the Validation Rule
IF(
??? ISNEW(),
??? Merchandise__r.Total_Inventory__c < Units_Sold__c ,
??? IF (
??????? Units_Sold__c < PRIORVALUE(Units_Sold__c),
??????? FALSE,
??????? Merchandise__r.Total_Inventory__c < (Units_Sold__c - PRIORVALUE(Units_Sold__c))
??? )
)
ISNEW:如果你是在创建一个新记录时为true,否则为false
PRIORVALUE(Units_Sold__c):先前的Units_Sold__c值
Tutorial #4: Using Workflow and Approvals(类似存储过程)
Step 1: Populate the Line Item Price Using a Workflow Rule
即在Line Item创建的时候,给其Unit Price字段赋一个对应外键merchanise.price的值
步骤一:Rule Criteria选中formula evaluates to true
步骤二:在text文本框中输入“true”,这样每次创建记录的时候都为true
步骤三:添加一个Immediate Workflow Actions
步骤四:选中“Use a formula to set the new value”
步骤五:输入公式
步骤六:Activate激活这个workflow
Step 2: Update Total Inventory When an Order is Placed
创建line item的时候实时更新对应的库存(total inventory)
更新line item的时候也要更新库存
Step 4: Create an Email Template
当某一个清单(invoice statement)的总价超过2000的时候,发送email给manager确认
Step->Communication Templates->Email Templates
email模板:
{!Invoice_Statement__c.OwnerFullName}submitted for approval an Invoice Statement that totalled{!Invoice_Statement__c.Invoice_Value__c} on
{!Invoice_Statement__c.LastModifiedDate}
Step 5: Create an Approval Process
实现Step 4的需求
三种选择:
Initial Submission Actions:email发送后,设置status为pending
Final Approval Actions:manager允许后,设置status为closed
Final Rejections Actions:manager拒绝后,设置status为open
Step 6: Create a User
创建一个只有只读属性的User,控制他们只能看到部分数据
Administration Setup->Manage Users->Users
Profile:Standard User
Manager:选择你自己
Step 7: Test the Approval Process
查看approval流程图:App Setup->Create->Workflow &Approvals->Approval Processes->选择创建的approval->View Diagram