windows下自动部署应用到jetty的脚本
在window下创建自动根据properties配置文件动态生成jetty的部署脚本,maven编译应应用后可直接运行改发布脚本将应用部署到jetty上.
?
1.maven创建一个叫tutorial1的应用
2.在根目录下创建路径framework2,用于存放jetty的配置文件,相关jar包,启动脚本,内容截图如下:
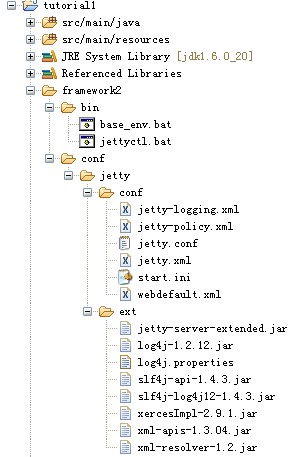
? ? ? ? 其中,jetty-logging.xml,jetty.xml,start.ini,base_env.bat,jettyctl.bat这几个文件在maven编译是需要做变量替换,同时将framework2下的所有文件拷贝到target/web-deploy目录下,变量替换文件为antx.properties,该文件放在应用根目录下,为了实现替换功能需要在maven的pom.xml文件中添加命令,以下是pom.xml:
<?xml version="1.0" encoding="UTF-8"?>
<!-- Maven POM -->
<project xmlns="http://maven.apache.org/POM/4.0.0" xmlns:xsi="http://www.w3.org/2001/XMLSchema-instance"
xsi:schemaLocation="http://maven.apache.org/POM/4.0.0 http://maven.apache.org/maven-v4_0_0.xsd">
?
<parent>
<groupId>com.alibaba</groupId>
<artifactId>pampas</artifactId>
<version>3-RC1</version>
</parent>
?
<modelVersion>4.0.0</modelVersion>
<groupId>com.alibaba.webx</groupId>
<artifactId>tutorial1</artifactId>
<name>My Simple Webx Application</name>
<packaging>war</packaging>
<version>1.0-SNAPSHOT</version>
<properties>
<java.version>1.5</java.version>
<java.encoding>GBK</java.encoding>
<webx-version>3.0.0-GA</webx-version>
<springext-plugin-version>1.0</springext-plugin-version>
<jetty-version>6.1.22</jetty-version>
<release_directory>${project.build.directory}</release_directory>
<binconf_directory>${project.build.directory}/web-deploy</binconf_directory>
<appName>tutorial1</appName>
</properties>
<build>
? ? ? ? ? ? ? ?<!--指定生成war包的应用名为tutorial1-->
<finalName>tutorial1</finalName>
?
<!--用于在maven编译时替换变量为antx.properties的值,结合resources使用<filters>-->
<!--<filter>D:/WebApp/tutorial1/antx.properties</filter>-->
<!--</filters>-->
?
<plugins>
<plugin>
<artifactId>maven-antrun-plugin</artifactId>
<executions>
<execution>
<phase>compile</phase>
<configuration>
<tasks>
? ? ? ? ? ? ? ? ? ? ? ? ? ? ? ? ? ? ? ? ? ? ? ? ? ? ? ? ? ? ? ? <!-- 用于打印相关信息-->
<echo message="project home: ? ? ? ?${basedir}" />
<echo message="java home: ? ? ? ? ? ${java.home}" />
<echo message="java source version: ${java.version}" />
<echo message="java target version: ${java.version}" />
<echo message="java source charset: ${java.encoding}" />
?
<!-- 创建web-deploy目录?-->
<mkdir dir="${binconf_directory}" />
<!-- 将framework2下的文件拷贝到web-deploy目录下-->
<copy todir="${binconf_directory}"encoding="${file_encoding}"?outputencoding="${file_encoding}">
? ? ?<fileset dir="${project.basedir}/framework2"></fileset>
<filterchain>
<!--replacetokens用于仅替换少量变量 ?-->
? ? ? ? ? ? ? ? ?<!--<replacetokens>-->
? ? ? ? ? ? ? ? ?<!--<token key="appName" value="${appName}" />-->
? ? ? ? ? ? ? ? ? <!--<token key="appName" value="${appName}" />-->
? ? ? ? ? ? ? ? ? ?<!--</replacetokens>-->
? ? ? ? ? ? ? ? <!-- filterreader 用于批量替换成antx.properties中的变量值 -->
<filterreader classname="org.apache.tools.ant.filters.ReplaceTokens">
<param type="propertiesfile" value="D:/WebApp/tutorial1/antx.properties" />
</filterreader>
</filterchain>
</copy>
<chmod dir="${binconf_directory}/bin" perm="755" includes="**" />
</tasks>
</configuration>
<goals>
<goal>run</goal>
</goals>
</execution>
</executions>
</plugin>
</plugins>
</build>
?
<dependencies>
<!-- WebX 3 -核心模块 -->
<dependency>
<groupId>com.alibaba.platform.shared</groupId>
<artifactId>webx3.core</artifactId>
</dependency>
<!-- WebX 3 -兼容模块 -->
<dependency>
<groupId>com.alibaba.platform.shared</groupId>
<artifactId>webx3.compat</artifactId>
</dependency>
<!-- WebX 3 -单元测试工具模块 -->
<dependency>
<groupId>com.alibaba.platform.shared</groupId>
<artifactId>webx3.test</artifactId>
<scope>test</scope>
</dependency>
</dependencies>
<dependencyManagement>
<dependencies>
<!-- ======================================== -->
<!-- WEBX依赖 -->
<!-- ======================================== -->
?
<!-- WebX 3 -核心模块 -->
<dependency>
<groupId>com.alibaba.platform.shared</groupId>
<artifactId>webx3.core</artifactId>
<version>${webx-version}</version>
</dependency>
<!-- WebX 3 -兼容模块 -->
<dependency>
<groupId>com.alibaba.platform.shared</groupId>
<artifactId>webx3.compat</artifactId>
<version>${webx-version}</version>
</dependency>
<!-- WebX 3 -单元测试工具模块 -->
<dependency>
<groupId>com.alibaba.platform.shared</groupId>
<artifactId>webx3.test</artifactId>
<version>${webx-version}</version>
</dependency>
</dependencies>
</dependencyManagement>
</project>
antx.properties如下:
log.root= D:/WebApp/tutorial1/all.log
tutorial1.appserver.port ?= 7001
tutorial1.debug.port ?= 7009
tutorial1.deployhome ?= D:/WebApp/tutorial1/target/web-deploy
tutorial1.httpdhome ? = /usr/alibaba/httpd
tutorial1.javahome ? ? ? ? = D:/Program Files/Java/jdk1.6.0_20
tutorial1.jettyhome ? ? ? ?= D:/jetty-distribution-7.4.2.v20110526
tutorial1.jettyserverhome ?= D:/WebApp/tutorial1/target/web-deploy/jetty_server
tutorial1.loggingLevel ? ? = ERROR
tutorial1.loggingRoot ? ? ?= D:/WebApp/tutorial1/target/web-deploy/output/logs
tutorial1.output ? ? ? ? ? = D:/WebApp/tutorial1/target/web-deploy/output
tutorial1.port ? ? ? ? ? ? = 80
tutorial1.production ? ? ? = false
tutorial1.root ? ? ? ? ? ? = D:/WebApp/tutorial1
替换变量前jetty.xml如下:
<?xml version="1.0"?>
<!DOCTYPE Configure PUBLIC "-//Jetty//Configure//EN" "http://www.eclipse.org/jetty/configure.dtd">
<!-- =============================================================== -->
<!-- Configure the Jetty Server ? ? ? ? ? ? ? ? ? ? ? ? ? ? ? ? ? ? ?-->
<!-- ? ? ? ? ? ? ? ? ? ? ? ? ? ? ? ? ? ? ? ? ? ? ? ? ? ? ? ? ? ? ? ? -->
<!-- Documentation of this file format can be found at: ? ? ? ? ? ? ?-->
<!-- http://wiki.eclipse.org/Jetty/Reference/jetty.xml_syntax ? ? ? ?-->
<!-- ? ? ? ? ? ? ? ? ? ? ? ? ? ? ? ? ? ? ? ? ? ? ? ? ? ? ? ? ? ? ? ? -->
<!-- Additional configuration files are available in JETTY_HOME/etc -->
<!-- and can be mixed in. ?For example: ? ? ? ? ? ? ? ? ? ? ? ? ? ? ?-->
<!-- ? java -jar start.jar etc/jetty.xml etc/jetty-ssl.xml ? ? ? ? ? -->
<!-- ? ? ? ? ? ? ? ? ? ? ? ? ? ? ? ? ? ? ? ? ? ? ? ? ? ? ? ? ? ? ? ? -->
<!-- See start.ini file for the default configuraton files ? ? ? ? ? -->
<!-- =============================================================== -->
<Configure id="Server" /></Set>
? ? ? ? ? ? <Set name="port"><Property name="jetty.port" default="@tutorial1.appserver.port@"/></Set>
? ? ? ? ? ? <!-- added by benni, to retrieve the client remote address in the webapp -->
? ? ? ? ? ? <Set name="forwarded">true</Set>
? ? ? ? ? ? <Set name="forwardedHostHeader">ignore</Set>
? ? ? ? ? ? <Set name="forwardedServerHeader">ignore</Set>
? ? ? ? ? ? <Set name="maxIdleTime">600000</Set>
? ? ? ? ? ? <Set name="Acceptors">2</Set>
? ? ? ? ? ? <Set name="acceptQueueSize">256</Set>
? ? ? ? ? ? <Set name="statsOn">false</Set>
? ? ? ? ? ? <Set name="confidentialPort">8443</Set>
? ? ? ? ? ? <Set name="lowResourcesConnections">2000</Set>
? ? ? ? ? ? <Set name="lowResourcesMaxIdleTime">5000</Set>
? ? ? ? ? ? <!-- modify 2011-04-08 for http status 413-->
? ? ? ? ? ? <Set name="requestHeaderSize">8192</Set>
<Set name="responseHeaderSize">8192</Set>
? ? ? ? ? </New>
? ? ? </Arg>
? ? </Call>
? ? <!-- =========================================================== -->
? ? <!-- Set handler Collection Structure ? ? ? ? ? ? ? ? ? ? ? ? ? ?-->
? ? <!-- =========================================================== -->
? ? <Set name="handler">
? ? ? <New id="Handlers" name="setProperty">
? ? ? ? <Arg>org.eclipse.jetty.server.Request.maxFormContentSize</Arg>
? ? ? ? <Arg>2097152</Arg>
? ? </Call>
? ? <!-- =========================================================== -->
? ? <!-- Configure the deployment manager ? ? ? ? ? ? ? ? ? ? ? ? ? ?-->
? ? <!-- ? ? ? ? ? ? ? ? ? ? ? ? ? ? ? ? ? ? ? ? ? ? ? ? ? ? ? ? ? ? -->
? ? <!-- Sets up 2 monitored dir app providers that are configured ? -->
? ? <!-- to behave in a similaraly to the legacy ContextDeployer ? ? -->
? ? <!-- and WebAppDeployer from previous versions of Jetty. ? ? ? ? -->
? ? <!-- =========================================================== -->
? ? <Call name="addBean">
? ? ? <Arg>
<New id="DeploymentManager" />
? ? ? ? ? </Set>
?
? ? ? ? ? <Call name="setContextAttribute">
? ? ? ? ? ? <Arg>org.eclipse.jetty.server.webapp.ContainerIncludeJarPattern</Arg>
? ? ? ? ? ? <Arg>.*/jsp-api-[^/]*\.jar$|.*/jsp-[^/]*\.jar$</Arg>
? ? ? ? ? </Call>
? ? ? ? ? <!-- Providers of Apps via WAR file existence.
? ? ? ? ? ? ? ?Configured to behave similar to the legacy WebAppDeployer -->
? ? ? ? ? <Call name="addAppProvider">
? ? ? ? ? ? <Arg>
? ? ? ? ? ? ? <New default="false"/></Set>
? ? ? ? ? ? ? ? <Set name="defaultsDescriptor">@tutorial1.jettyserverhome@/conf/webdefault.xml</Set>
? ? ? ? ? ? ? </New>
? ? ? ? ? ? </Arg>
? ? ? ? ? </Call>
? ? ? ? </New>
? ? ? </Arg>
? ? </Call>
</Configure>
替换变量前base_env.bat如下:
SET JAVA_HOME=@tutorial1.javahome@set DEPLOY_HOME=@tutorial1.deployhome@set OUTPUT_HOME=@tutorial1.output@set JETTY_HOME=@tutorial1.jettyhome@set JETTY_SERVER_HOME=@tutorial1.jettyserverhome@set PRODUCTION=@tutorial1.production@set LOG_DIR=%OUTPUT_HOME%\logsset JAVA_MEM_OPTS= -Xms128m -Xmx512m -XX:PermSize=128mset JAVA_OPTS_EXT= -Djava.awt.headless=true -Djava.net.preferIPv4Stack=true -Dapplication.codeset=GBK -Dmonitor.enable=true -Dmonitor.exclog.enable=true -Dmonitor.biz.interval=120 -Dmonitor.debug=false -Djava.util.logging.config.file="%DEPLOY_HOME%\conf\general\logging.properties"set DATABASE_OPTS= -Ddatabase.codeset=ISO-8859-1 -Ddatabase.logging=falseset URI_ENCODE= -Dorg.eclipse.jetty.util.URI.charset=GBKset JAVA_DEBUG_OPT= -server -Xdebug -Xnoagent -Djava.compiler=NONE -Xrunjdwp:transport=dt_socket,address=@tutorial1.debug.port@,server=y,suspend=nset JAVA_OPTS= %JAVA_MEM_OPTS% %DATABASE_OPTS% %JAVA_OPTS_EXT% %JAVA_DEBUG_OPT% %URI_ENCODE%
jettyctl.bat如下:@echo off@if not "%ECHO%" == "" ?echo %ECHO%@if "%OS%" == "Windows_NT" ?setlocalset ENV_PATH=.\if "%OS%" == "Windows_NT" set ENV_PATH=%~dp0%call %ENV_PATH%\base_env.batREM copy file to jetty server.RMDIR "%JETTY_SERVER_HOME%" /S /QMKDIR "%JETTY_SERVER_HOME%"MKDIR "%JETTY_SERVER_HOME%\logs"MKDIR "%JETTY_SERVER_HOME%\tmp"MKDIR "%JETTY_SERVER_HOME%\webapps"REM create output/logs for jetty_stdout.logMKDIR "%OUTPUT_HOME%/logs"REM jetty argsset JETTY_PROS= -Djetty.logs="%JETTY_SERVER_HOME%\logs" -Djetty.home="%JETTY_HOME%" -Djava.io.tmpdir="%JETTY_SERVER_HOME%\tmp"set JETTY_ARGS= --ini="%JETTY_SERVER_HOME%\conf\start.ini"for %%a in ("%DEPLOY_HOME%\..\*.war") do (if exist "%JETTY_SERVER_HOME%\webapps\tutorial1.war" (DEL /F /S /Q "%JETTY_SERVER_HOME%\webapps\tutorial1.war"echo "remove duplicate tutorial1.war")COPY "%%a" "%JETTY_SERVER_HOME%\webapps\tutorial1.war" /Y)XCOPY ?"%DEPLOY_HOME%\conf\jetty" "%JETTY_SERVER_HOME%" /Y /S /QREM cls screen?rem CLS"%JAVA_HOME%\bin\java" %JAVA_OPTS% %JETTY_PROS% -jar %JETTY_HOME%\start.jar %JETTY_ARGS%
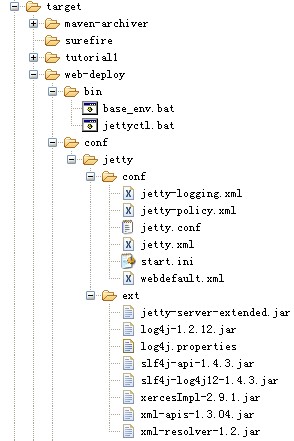
运行mvn clean install eclipse:eclip 编译后,将在target目录下生成web-deploy目录,如下:
?此时只需执行target\web-deploy\bin\jettyctl.bat脚本即可将应用部署到jetty,同时在web-deploy目录下生成jetty_server目录及web-deploy/output目录:
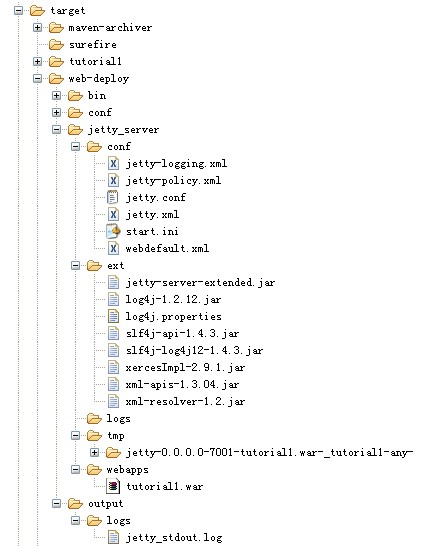
?在浏览器输入:http://localhost:7001/tutorial1/hello.htm即可运行,同时debug端口为7009。framework2文件夹见附件