netzke简介及基本入门教程
1. netzke介绍netzke是封装了Ext JS的一个RIA framework,用来在Rails下做开发,可以很大的提高开发的速度。
This post will lead you through simple steps of creating a task manager web application with Ext JS, Ruby on Rails, and Netzke It will take you approximately 7 minutes to build, and if you're beforehand curious whether it's worth following, go straight to the last section but one (by far the biggest in this tutorial), where I discuss the results. The goal is to create a web application that will allow you to add, edit and remove TODO tasks, as well as mark them done. In addition to that, you'll be able to sort and search the tasks, edit several tasks at once, and more. You may start you stopwatch now, and let's get to the job.
Writing this tutorial, I was using: Rails 3.2.6, netzke-core 0.7.6, netzke-basepack 0.7.6, Ruby 1.9.3, Ext JS 4.0.7.
Create a new rails application:
> rails new netzke_task_manager && cd netzke_task_manager
Add the Netzke gems to your Gemfile:
gem 'netzke-core', '0.7.6'gem 'netzke-basepack', '0.7.6'
Install the gems:
> bundle install
Link the Ext library and, optionally, the FamFamFam silk icons, for example (most probably no copy-pasting here!):
> ln -s ~/code/extjs/ext-4.0.7 public/extjs> mkdir public/images> ln -s ~/assets/famfamfam-silk public/images/icons
Declare Netzke routes and uncomment the root map in routes.rb:
NetzkeTaskManager::Application.routes.draw do netzke root :to => "welcome#index" # ...end
Generate the welcome controller:
> rails g controller welcome index
Don't forget to remove public/index.html.
In the application layout replace the default JavaScript and stylesheets inclusion with the netzke_init helper, so that the result looks like this:
<!DOCTYPE html><html><head> <title>Netzke Task Manager</title> <%= netzke_init %> <%= csrf_meta_tag %></head><body><%= yield %></body></html>
Note that netzke_init is all what's needed to include Ext and Netzke JavaScript and stylesheets.
3 minutes passed, we're ready to get to the fun part.
Let's create the Task model that will have a name, priority, notes, due date, and the "done" flag:
> rails g model Task done:boolean name:string notes:text priority:integer due:date
Modify the migrations file (db/migrate/xxx_create_tasks.rb) slightly to have the "done" flag set to false by default:
t.boolean :done, :default => false
Run the migrations:
> rake db:migrate
We want our task to always have at least the name set, so, let's add the proper validations. And set the default scope to only give us incomplete tasks:
class Task < ActiveRecord::Base validates_presence_of :name default_scope :conditions => {:done => false}endWe don't have much to do to see an Ext grid as an interface to our model. Simply declare Netzke GridPanel inapp/views/welcome/index.html.erb:
<%= netzke :tasks, :class_name => "Netzke::Basepack::GridPanel", :model => "Task", :height => 400 %>
Start the server:
> rails s
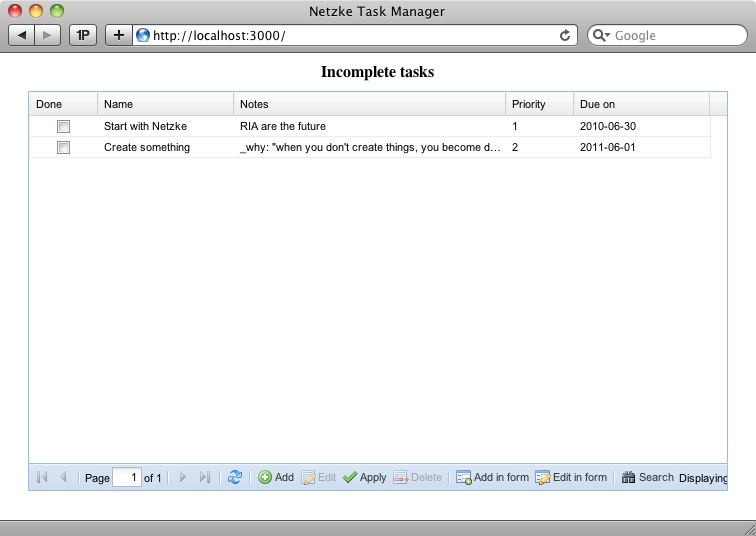
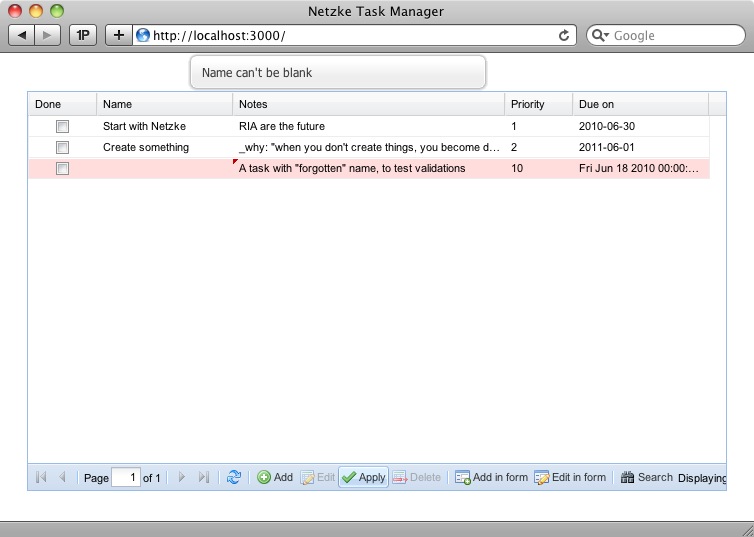
... and see how it looks on http://localhost:3000/:
It's fully functional and nice-looking already. In a moment I'll provide you with an impressive list of all the things you can do with it, but first let's tweak it a bit so that it looks even nicer - we still have plenty of time for that.
With Netzke::Basepack::GridPanel you can easily customize the columns (see a comprehensive tutorial about it). Let's do 2 simple things here: 1) provide the list of the columns that we want to see, excluding the created_at andupdated_at columns that Rails adds by default, and 2) change the title of the "due" column to "Due on".
<%= netzke :tasks, :class_name => "Netzke::Basepack::GridPanel", :model => "Task", :height => 400, :columns => [:done, :name, :notes, :priority, {:name => :due, :header => "Due on"}]%>Perfect. Let's use our last 2 minutes to do the final - purely visual - touch. Let's display our grid in the middle of the page, under a title, without that thick blue header, and with a nice border around. And also let's adjust some columns' default width and make them automatically occupy the whole available width of the grid.
To put the grid in the middle of the page, let's quickly add some inline styles into the application layout (after thenetzke_init helper):
<style type="text/css" media="screen"> h1 { text-align: center; margin: 10px;} .netzke-component { width: 700px; margin: auto; }</style>To add a title, enable the border and disable the grid's header, update the view:
<h1>Incomplete tasks</h1><%= netzke :tasks, :class_name => "Netzke::Basepack::GridPanel", :model => "Task", :height => 400, :columns => [:id, :done, :name, {:name => :notes, :width => 200}, {:name => :priority, :width => 50}, {:name => :due, :header => "Due on"} ], # Standard Ext.grid.EditorGridPanel configuration options: :border => true, :header => false, :view_config => { :force_fit => true # force the columns to occupy all the available width }%>Well, that's it! Stop your stopwatch, and let's discuss in details what we've got:
Because Netzke::Basepack::GridPanel is a very powerful Netzke component, our application gets a lot of features for free.
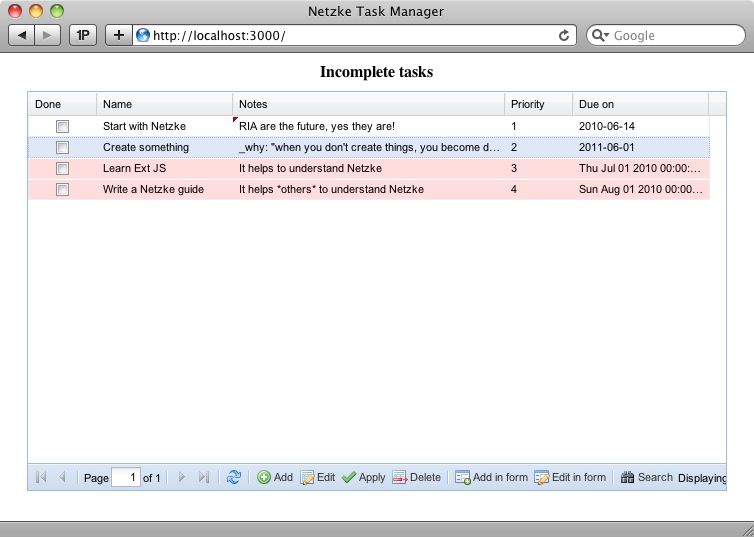
Adding, updating and deleting records can easily be done in a multiline way:
Even if you data table contains tens of thousands of records, it's no problem for a Netzke grid panel, thanks to the built-in pagination.
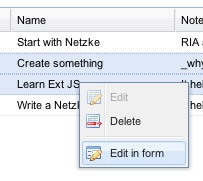
Some of the button actions on the bottom of the grid are duplicated in the grid's context menu:
In our application we're using an integer, boolean, string, text, and date fields in the Task model - and each of them are getting its own column type (you'll not be able to enter letters in the priority field).
Rails validations are respected (and they play nicely with multiline editing!):
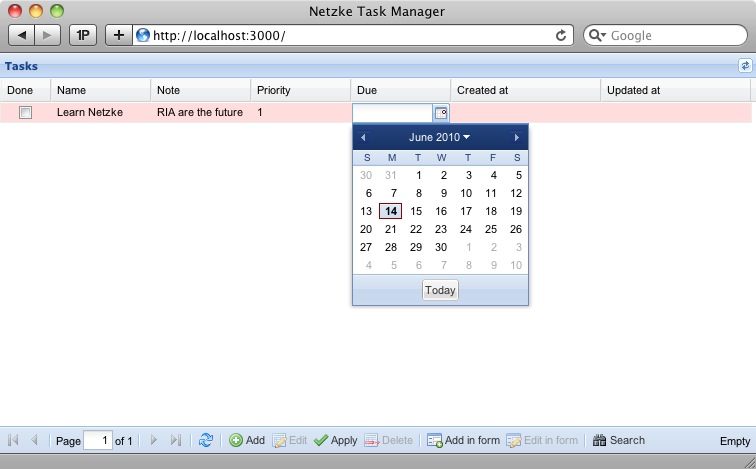
Click the header of the column to enable server-side sorting:
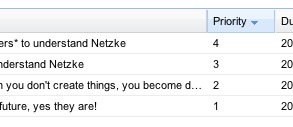
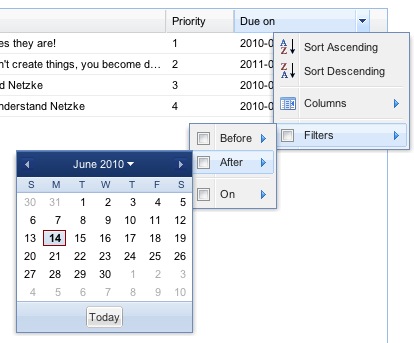
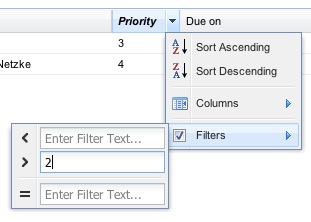
Smart filters are enabled by default by each column, corresponding to the data type.
For due-date:
For priority:
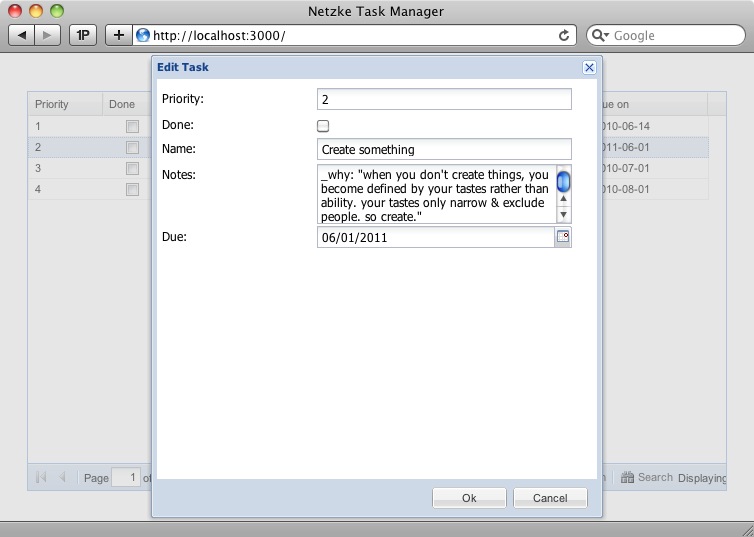
Sometimes adding/editing a record is much handier from within a form. Netzke gives you that, too. And even multi-record editing is supported - just select multiple rows and press "Edit in form".
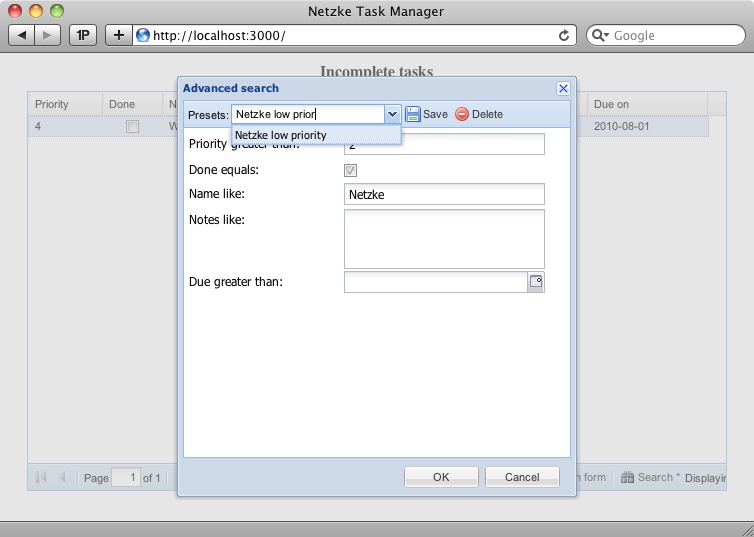
Note: presets management was temporally left out during the move to Rails 3, but will soon be back.
While not covered in this tutorial, Netzke grid panel also supports: