使用Axis2开发WebService-示例
本文介绍如何开发一个基本的WebService,不涉及具体IDE.
首先,编写一个WSDL文件.
hello.wsdl
<?xml version="1.0" encoding="UTF-8"?><wsdl:definitions name="hello" targetNamespace="http://www.bisoft.tl/hello/" xmlns:wsdl="http://schemas.xmlsoap.org/wsdl/" xmlns:tns="http://www.bisoft.tl/hello/" xmlns:xsd="http://www.w3.org/2001/XMLSchema" xmlns:soap="http://schemas.xmlsoap.org/wsdl/soap/"><wsdl:types><xsd:schema xmlns:xsd="http://www.w3.org/2001/XMLSchema"targetNamespace="http://www.bisoft.tl/hello/"><xsd:element name="helloRequest"><xsd:complexType><xsd:sequence><xsd:element name="msg" type="xsd:string"></xsd:element></xsd:sequence></xsd:complexType></xsd:element><xsd:element name="helloResponse"><xsd:complexType><xsd:sequence><xsd:element name="rtn" type="xsd:string"></xsd:element></xsd:sequence></xsd:complexType></xsd:element></xsd:schema></wsdl:types><wsdl:message name="helloRequest"><wsdl:part name="helloRequest" element="tns:helloRequest"></wsdl:part></wsdl:message><wsdl:message name="helloResponse"><wsdl:part name="helloResponse" element="tns:helloResponse"></wsdl:part></wsdl:message><wsdl:portType name="HelloService"><wsdl:operation name="hello"><wsdl:input message="tns:helloRequest"></wsdl:input><wsdl:output message="tns:helloResponse"></wsdl:output></wsdl:operation></wsdl:portType><wsdl:binding name="binding1" type="tns:HelloService"><soap:binding style="document"transport="http://schemas.xmlsoap.org/soap/http" /><wsdl:operation name="hello"><soap:operation soapAction="http://www.bisoft.tl/hello/hello" /><wsdl:input><soap:body use="literal" /></wsdl:input><wsdl:output><soap:body use="literal" /></wsdl:output></wsdl:operation></wsdl:binding><wsdl:service name="WebService"><wsdl:port name="Port1" binding="tns:binding1"><soap:address location="http://localhost:8080/services" /></wsdl:port></wsdl:service></wsdl:definitions>
<wsdl:service name="WebService"><wsdl:port name="Port1" binding="tns:binding1"><soap:address location="http://localhost:8080/services" /></wsdl:port></wsdl:service>
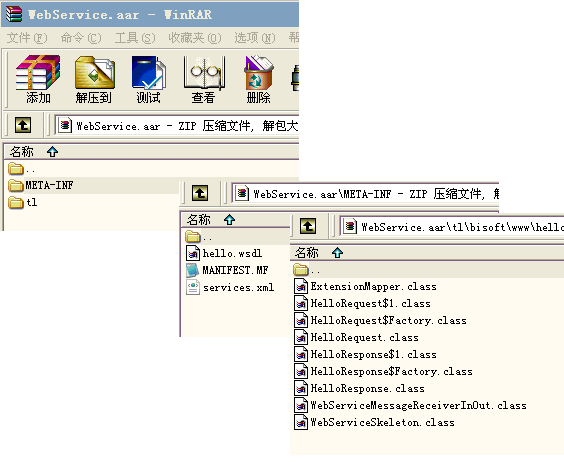
package std.ws.util;import org.apache.axis2.wsdl.WSDL2Code;public class CodeGenerator {public static void main(String[] args) throws Exception {WSDL2Code.main(new String[] {"-ss","-sd","-S", "src","-R", "src/META-INF","-ns2p", "http://www.bisoft.tl/hello=tl.bisoft.hello","-uri", "resources/hello.wsdl" });System.out.println("Done!");}}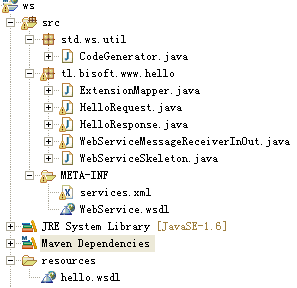
package std.ws.client.util;import org.apache.axis2.wsdl.WSDL2Code;public class CodeGenerator {public static void main(String[] args) throws Exception {WSDL2Code.main(new String[] { "-S", "src", "-R", "src/META-INF", "-ns2p", "http://www.bisoft.tl/hello=tl.bisoft.hello", "-uri", "resources/hello.wsdl" });System.out.println("Done!");}}package std.ws.client;import java.rmi.RemoteException;import tl.bisoft.www.hello.WebServiceStub;import tl.bisoft.www.hello.WebServiceStub.HelloRequest;import tl.bisoft.www.hello.WebServiceStub.HelloResponse;public class WSClient {public static void main(String[] args) throws RemoteException {String endpoint = "http://localhost:8080/axis2/services/WebService";WebServiceStub stub = new WebServiceStub(endpoint);HelloRequest request = new HelloRequest();request.setMsg("hello, bisoft!");HelloResponse reponse = new HelloResponse();reponse = stub.hello(request);String rtn = reponse.getRtn();System.out.println(rtn);}}public class WSClient {public static void main(String[] args) throws IOException {String endpoint = "http://localhost:8080/axis2/services/WebService";WebServiceStub stub = new WebServiceStub(endpoint);HelloRequest request = new HelloRequest();request.setMsg("hello, bisoft!");WebServiceCallbackHandler callback = new WebServiceCallbackHandler() {public void receiveResulthello(HelloResponse response) {String rtn = response.getRtn();System.out.println("async message!");System.out.println(rtn);}};stub.starthello(request, callback);System.out.println("Please enter to exit!");new BufferedReader(new InputStreamReader(System.in)).readLine();}}