Spring数据库访问之ORM(一)Spring数据库访问中另外一大模块就是ORM,ORM即对象/关系映射。Spring支持大多数O
Spring数据库访问之ORM(一)
Spring数据库访问中另外一大模块就是ORM,ORM即对象/关系映射。Spring支持大多数ORM框架,比如Hibernate,JPA,JDO,TopLink和iBatis(Spring2支持iBatis2,现MyBatis3的Spring支持由MyBatis社区开发,并非Spring)。
首先我们从单独使用ORM框架开始,来介绍Spring对ORM的支持,以Hibernate为例。使用ORM框架,需要提供持久化类,以课程管理为背景,如下设计课程类:
package org.ourpioneer.course.bean;import java.sql.Date;/** * 课程信息描述bean * * @author Nanlei * */public class Course {private Long id;private String title;private java.util.Date startDate;private java.util.Date endDate;private int fee;//必须提供无参默认构造方法public Course() {super();}//省略其它构造方法,getter和setter等方法}作为对数据访问的一种模式,我们仍然应用DAO模式,写DAO类已经很熟练了,如下设计即可:
package org.ourpioneer.course.dao;import java.util.List;import org.ourpioneer.course.bean.Course;public interface CourseDAO {public void save(Course course);public void delete(Course course);public void update(Course course);public Course findById(Long courseId);public List<Course> findAll();}非常简单的设计,包含CRUD操作,那么实现类中我们用Hibernate帮助我们进行数据库访问操作也非常简单:
package org.ourpioneer.course.dao;import java.util.List;import org.hibernate.Query;import org.hibernate.Session;import org.hibernate.SessionFactory;import org.hibernate.Transaction;import org.hibernate.cfg.Configuration;import org.ourpioneer.course.bean.Course;public class CourseDAOImpl implements CourseDAO {private SessionFactory sessionFactory;public CourseDAOImpl() {Configuration cfg = new Configuration().configure();sessionFactory = cfg.buildSessionFactory();}public List<Course> findAll() {Session session = sessionFactory.openSession();try {Query query = session.createQuery("from Course");return query.list();} finally {session.close();}}public Course findById(Long courseId) {Session session = sessionFactory.openSession();try {return (Course) session.get(Course.class, courseId);} finally {session.close();}}public void save(Course course) {Session session = sessionFactory.openSession();Transaction tx = session.beginTransaction();try {tx.begin();session.saveOrUpdate(course);tx.commit();} catch (RuntimeException e) {tx.rollback();throw e;} finally {session.close();}}}这里只展示几个方法作为代表,其它方法类似可以写出,非常简单。首先是构造方法,初始化实现类时创建Hibernate的配置对象,new Configuration().configure()时,Hibernate会在类路径的根路径下自动寻找名为hibernate.cfg.xml的配置文件并加载,之后就是创建Hibernate的Session对象,利用Session对象提供和衍生出的方法来进行数据库操作。下面来看配置文件,这是比较重要的,因为通过配置文件,把数据库信息和实体Bean的信息都告诉Hibernate,可以省去我们很多在数据库设计上的事情。
<?xml version='1.0' encoding='UTF-8'?><!DOCTYPE hibernate-configuration PUBLIC "-//Hibernate/Hibernate Configuration DTD 3.0//EN" "http://hibernate.sourceforge.net/hibernate-configuration-3.0.dtd"><hibernate-configuration><session-factory><property name="connection.driver_class">com.mysql.jdbc.Driver</property><property name="connection.url">jdbc:mysql:///test</property><property name="connection.username">root</property><property name="connection.password">123</property><property name="dialect">org.hibernate.dialect.MySQLDialect</property><property name="show_sql">true</property><property name="hbm2ddl.auto">update</property><mapping resource="org/ourpioneer/course/hbm/course.hbm.xml" /></session-factory></hibernate-configuration>
这里我们告诉Hibernate使用mysql数据库,并配置数据库信息,所用方言,并在执行应用程序时在控制台打印出还原的SQL语句。使用hbm2ddl.auto可以让Hibernate根据实体Bean的配置信息来自动建表,这是很方便的,最后的mapping就是配置实体bean映射信息的文件,我们来看一下:
<?xml version="1.0" encoding="UTF-8"?><!DOCTYPE hibernate-mapping PUBLIC "-//Hibernate/Hibernate Mapping DTD 3.0//EN""http://hibernate.sourceforge.net/hibernate-mapping-3.0.dtd"><hibernate-mapping package="org.ourpioneer.course.bean"><class name="Course" table="course"><id name="id" type="java.lang.Long" column="ID"><generator /></id><property name="title" type="java.lang.String" column="TITLE"length="100" not-null="true" /><property name="startDate" type="java.sql.Date" column="STARTDATE"not-null="true" /><property name="endDate" type="java.sql.Date" column="ENDDATE"not-null="true" /><property name="fee" type="java.lang.Integer" column="FEE"not-null="true" /></class></hibernate-mapping>
这里首先配置了实体bean的所在位置,类信息还有数据库中表对应的关系。之后创建主键信息id,使用了MySQL的自增主键特性,剩下就是对各个字段的描述了,都见名知意,易于理解。
准备好这些内容,就可以编写测试程序了,在项目中引入Hibernate的相关依赖。这里说明一下,Maven默认仓库是Apache的,其中的Hibernate版本还在3.3.2.GA(本文编写时),而当前的Hibernate官方版本已经是3.6.0.Final了,我们想使用新版本,该怎么办?很简单,配置Maven仓库的位置,让其可以发现3.6.0.Final版的Hibernate并下载依赖。JBoss官方也提供一个Maven仓库,其中就有最新版的Hibernate,那么我们在项目的POM中配置一下这个地址:
<repositories><repository><releases><updatePolicy>always</updatePolicy></releases><snapshots><updatePolicy>always</updatePolicy></snapshots><id>Jboss</id><name>Jboss Repository</name><url>https://repository.jboss.org/nexus/content/groups/public</url></repository></repositories>
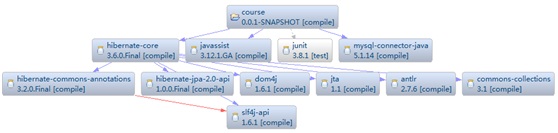
之后,为项目引入其它必要的依赖,使用Maven管理,我们不需自己再去寻找各种依赖了,非常简单的管理,如图所示:
下面来看示例程序:
package org.ourpioneer.course;import java.util.GregorianCalendar;import java.util.List;import org.ourpioneer.course.bean.Course;import org.ourpioneer.course.dao.CourseDAO;import org.ourpioneer.course.dao.CourseDAOImpl;public class Demo {public static void main(String[] args) {CourseDAO courseDAO = new CourseDAOImpl();Course course = new Course();course.setTitle("Spring ORM");course.setStartDate(new GregorianCalendar(2011, 1, 1).getTime());course.setEndDate(new GregorianCalendar(2011, 2, 1).getTime());course.setFee(100);courseDAO.save(course);List<Course> courses = courseDAO.findAll();Long courseId = courses.get(0).getId();course = courseDAO.findById(courseId);System.out.println(course);courseDAO.delete(course);}}首先创建的是Course对象,并设置其中的属性,使用save方法将其持久化到数据库中,之后通过findAll方法查询数据库中的全部记录,当然现在只有一条。并拿到Id,在通过findById方法获取出来,然后打印结果。最终删除记录。执行该程序,我们可以得到如下输出信息:
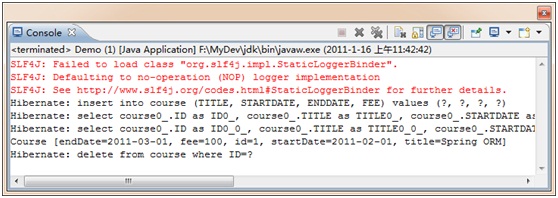
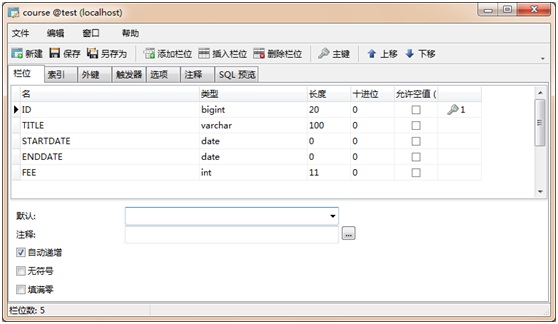
我们之前并没有在数据库中建表,而Hibernate在执行插入之前会为我们自动建表,然后执行插入操作,两次查询操作,并打印出对象信息,最后执行了删除操作,从SQL语句中可以看到Hibernate最终的执行结果是什么。而此时回到数据库中,会发现一个建好的表。
Hibernate的简单ORM映射操作就介绍完了,下面来看使用JPA注解和Hibernate的API来持久化对象,首先修改持久化类:
package org.ourpioneer.course.bean;import java.sql.Date;import javax.persistence.Column;import javax.persistence.Entity;import javax.persistence.GeneratedValue;import javax.persistence.GenerationType;import javax.persistence.Id;import javax.persistence.Table;/** * 课程信息描述bean * * @author Nanlei * */@Entity@Table(name = "course")public class Course {@Id@GeneratedValue(strategy = GenerationType.IDENTITY)@Column(name = "ID")private Long id;@Column(name = "TITLE", length = 100, nullable = false)private String title;@Column(name = "STARTDATE",nullable=false)private java.util.Date startDate;@Column(name = "ENDDATE",nullable=false)private java.util.Date endDate;@Column(name = "FEE",nullable=false)private int fee;// 其余内容不变,省略}使用JPA的注解,首先对类进行注解,使用@Entity,并关联数据库表,使用@Table。下面就是对字段进行主键了,标识符(主键)字段要使用@Id,还要指定生成策略和对应的列名,剩下的字段只需指定列信息即可。现在告诉Hibernate我们使用JPA注解,而不使用映射文件了,如下配置:
<!-- <mapping resource="org/ourpioneer/course/hbm/course.hbm.xml" /> --><mapping name="code">public CourseDAOImpl() {// Configuration cfg = new Configuration().configure();Configuration cfg = new AnnotationConfiguration().configure();sessionFactory = cfg.buildSessionFactory();}此时再次执行测试方法,反馈的信息没有任何变化,但是我们就使用了JPA注解而并非Hibernate的映射信息了。下面来看看使用Hibernate作为JPA引擎的持久化步骤。先配置依赖,引入:
<dependency><groupId>org.hibernate</groupId><artifactId>hibernate-entitymanager</artifactId><version>3.6.0.Final</version><type>jar</type><scope>compile</scope></dependency><dependency><groupId>jboss</groupId><artifactId>jboss-archive-browsing</artifactId><version>5.0.0alpha-200607201-119</version><type>jar</type><scope>compile</scope></dependency>
如果在Java EE容器中运行JPA,可以通过容器来配置JPA,如果是在Java SE中运行JPA,那么需要在类路径的META-INF下配置persistence.xml来配置持久化单元,在本例中我们使用Hibernate作为JPA的引擎,就可以这么来写:
<?xml version='1.0' encoding='UTF-8'?><persistence xmlns="http://java.sun.com/xml/ns/persistence"xmlns:xsi="http://www.w3.org/2001/XMLSchema-instance"xsi:schemaLocation="http://java.sun.com/xml/ns/persistencehttp://java.sun.com/xml/ns/persistence/persistence_1_0.xsd"version="1.0"><persistence-unit name="course"><properties><property name="hibernate.ejb.cfgfile" value="/hibernate.cfg.xml" /></properties></persistence-unit></persistence>
加载配置文件仍然使用Hibernate的配置文件,或者也可以将其中的property写在persistence.xml中,那么因为在这里JPA已经可以获取持久化单元了,在Hibernate的配置中就需要配置持久化对象的映射了,去掉mapping信息即可。有了配置信息,还需要实现类,我们重写一个JPA的DAO实现,如下:
package org.ourpioneer.course.dao;import java.util.List;import javax.persistence.EntityManager;import javax.persistence.EntityManagerFactory;import javax.persistence.EntityTransaction;import javax.persistence.Persistence;import javax.persistence.Query;import org.ourpioneer.course.bean.Course;public class CourseDAOImplJPA implements CourseDAO {private EntityManagerFactory entityManagerFactory;public CourseDAOImplJPA() {entityManagerFactory = Persistence.createEntityManagerFactory("course");}public void delete(Course course) {EntityManager manager = entityManagerFactory.createEntityManager();EntityTransaction tx = manager.getTransaction();try {tx.begin();manager.remove(manager.merge(course));tx.commit();} catch (RuntimeException e) {tx.rollback();throw e;} finally {manager.close();}}public List<Course> findAll() {EntityManager manager = entityManagerFactory.createEntityManager();try {Query query = manager.createQuery("select course from Course course");return query.getResultList();} finally {manager.close();}}public Course findById(Long courseId) {EntityManager manager = entityManagerFactory.createEntityManager();try {return manager.find(Course.class, courseId);} finally {manager.close();}}public void save(Course course) {EntityManager manager = entityManagerFactory.createEntityManager();EntityTransaction tx = manager.getTransaction();try {tx.begin();manager.persist(course);tx.commit();} catch (RuntimeException e) {tx.rollback();throw e;} finally {manager.close();}}public void update(Course course) {EntityManager manager = entityManagerFactory.createEntityManager();EntityTransaction tx = manager.getTransaction();try {tx.begin();manager.merge(course);tx.commit();} catch (RuntimeException e) {tx.rollback();throw e;} finally {manager.close();}}}这里特别要注意的是delete方法,首先调用merge方法,否则当前对象是出于脱管态的,无法和Session进行关联,也就无法删除该对象。不加merge方法时候会抛出异常,大家可以测试一下,因为底层还是Hibernate进行的,Hibernate的持久化对象有三种状态,那么就要注意状态发生的变化。
下一篇将继续展开讨论,未完待续。
