
Spring3MVC 在JSP中使用@ModelAttribute在教程中,我们将创建一个简单的Spring3MVC simple CRUD应用程序.什
Spring3MVC 在JSP中使用@ModelAttribute
在教程中,我们将创建一个简单的Spring3MVC simple CRUD应用程序.
什么是@ModelAttribute
Spring3关于@ModelAttribute的文档
根据配合m2eclipse创建一个标准的maven web项目
我们创建一个名为spring-jsp的web项目.并添加图下所示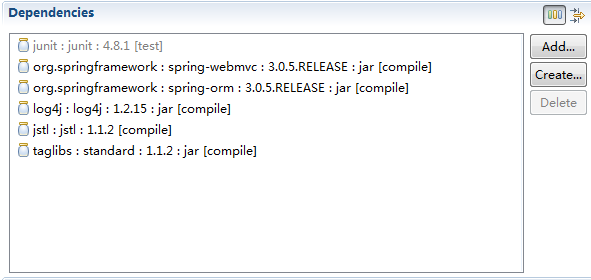
为了开启SpringMVC,我们需要在web.xml添加以下内容
web.xml
<?xml version="1.0" encoding="UTF-8"?><web-app id="WebApp_ID" version="2.4"xmlns="http://java.sun.com/xml/ns/j2ee" xmlns:xsi="http://www.w3.org/2001/XMLSchema-instance"xsi:schemaLocation="http://java.sun.com/xml/ns/j2ee http://java.sun.com/xml/ns/j2ee/web-app_2_4.xsd"><servlet><servlet-name>spring</servlet-name><servlet-class>org.springframework.web.servlet.DispatcherServlet</servlet-class><load-on-startup>1</load-on-startup></servlet><servlet-mapping><servlet-name>spring</servlet-name><url-pattern>/</url-pattern></servlet-mapping><listener><listener-class>org.springframework.web.context.ContextLoaderListener</listener-class></listener></web-app>
在web.xml中我们定义servlet:spring.
按照惯例,我们必须声明一个spring-servle.xml
用springIDE插件创建一个配置xml.
内容包含:
spring-servle.xml
<?xml version="1.0" encoding="UTF-8"?><beans xmlns="http://www.springframework.org/schema/beans"xmlns:xsi="http://www.w3.org/2001/XMLSchema-instance" xmlns:p="http://www.springframework.org/schema/p"xsi:schemaLocation="http://www.springframework.org/schema/beans http://www.springframework.org/schema/beans/spring-beans-3.0.xsd"><!-- 定义一个视图解析器 --><bean id="viewResolver"p:suffix=".jsp" /></beans>
这个XML配置声明一个视图解析器.在控制器中会根据JSP名映射到/ WEB-INF/jsp中相应的位置.
然后创建一个applicationContext.xml.
applicationContext.xml
<?xml version="1.0" encoding="UTF-8"?><beans xmlns="http://www.springframework.org/schema/beans"xmlns:xsi="http://www.w3.org/2001/XMLSchema-instance" xmlns:context="http://www.springframework.org/schema/context"xmlns:mvc="http://www.springframework.org/schema/mvc"xsi:schemaLocation="http://www.springframework.org/schema/beans http://www.springframework.org/schema/beans/spring-beans-3.0.xsd http://www.springframework.org/schema/context http://www.springframework.org/schema/context/spring-context-3.0.xsdhttp://www.springframework.org/schema/mvc http://www.springframework.org/schema/mvc/spring-mvc-3.0.xsd"><!-- 激活spring的注解. --><context:annotation-config /><!-- 扫描注解组件并且自动的注入spring beans中. 例如,他会扫描org.liukai.tutorial下@Controller 和@Service下的文件.所以确保此base-package设置正确. --><context:component-scan base-package="org.liukai.tutorial" /><!-- 配置注解驱动的Spring MVC Controller 的编程模型.注:此标签只在 Servlet MVC工作! --><mvc:annotation-driven /></beans>
首先让我们定义两个简单的POJO
Address.java
package org.liukai.tutorial.domain;import java.io.Serializable;public class Address implements Serializable {private static final long serialVersionUID = -8889854671283221397L;private Integer id;private String street;private String zipCode;private String city; ......getter/setter}Person.java
package org.liukai.tutorial.domain;import java.io.Serializable;public class Person implements Serializable {private static final long serialVersionUID = -8333984959652704635L;private Integer id;private String firstName;private String lastName;private String currency;private Double money; ......getter/setter}然后实现2个简单的service层用于填充和处理业务逻辑.
AddressService.java
package org.liukai.tutorial.service;import java.util.ArrayList;import java.util.List;import org.apache.log4j.Logger;import org.liukai.tutorial.domain.Address;import org.springframework.stereotype.Service;import org.springframework.transaction.annotation.Transactional;/** * 同样用于显示. * * @author liukai * */@Service("addressService")@Transactionalpublic class AddressService {protected static Logger logger = Logger.getLogger("service");/** * 获得所有的地址. * * @return */public List<Address> getAll() {logger.debug("Retrieving all addresses");List<Address> addresses = new ArrayList<Address>();// New addressAddress address = new Address();address.setId(1);address.setStreet("1 Street");address.setCity("City 1");address.setZipCode("11111");// Add to listaddresses.add(address);// New addressaddress = new Address();address.setId(2);address.setStreet("2 Street");address.setCity("City 2");address.setZipCode("22222");// Add to listaddresses.add(address);// New addressaddress = new Address();address.setId(3);address.setStreet("3 Street");address.setCity("City 3");address.setZipCode("33333");// Add to listaddresses.add(address);// Return all addressesreturn addresses;}}PersonService.java
package org.liukai.tutorial.service;import java.util.ArrayList;import java.util.HashMap;import java.util.List;import java.util.Map;import org.apache.log4j.Logger;import org.liukai.tutorial.domain.Person;import org.springframework.stereotype.Service;import org.springframework.transaction.annotation.Transactional;/** * 注意这个只是一个临时数据用于显示. * * @author liukai * */@Service("personService")@Transactionalpublic class PersonService {protected static Logger logger = Logger.getLogger("service");private HashMap<Integer, Person> database = new HashMap<Integer, Person>();/** * Initialize a list of persons */private void init() {// New personPerson person = new Person();person.setId(1);person.setFirstName("John");person.setLastName("Smith");person.setCurrency("Dollar");person.setMoney(1500.00);// Add to listdatabase.put(1, person);// New personperson = new Person();person.setId(2);person.setFirstName("Jane");person.setLastName("Adams");person.setCurrency("Yen");person.setMoney(1000.00);// Add to listdatabase.put(2, person);// New personperson = new Person();person.setId(3);person.setFirstName("Mike");person.setLastName("Polaski");person.setCurrency("Euro");person.setMoney(2000.00);// Add to listdatabase.put(3, person);}public PersonService() {// Initialize dummy databaseinit();}/** * 检索所有的 persons */public List<Person> getAll() {logger.debug("Retrieving all persons");// Initialize our arrayList<Person> persons = new ArrayList<Person>();// Iterate the databasefor (Map.Entry<Integer, Person> entry : database.entrySet()) {persons.add(entry.getValue());}// Return all personsreturn persons;}/** * 根据ID获得对应的Perosn */public Person get(Integer id) {logger.debug("Retrieving person based on his id");return database.get(id);}/** * 修改Person */public void edit(Person person) {logger.debug("Editing existing person");// Note this is not the best way to update a data!// Delete existing userdatabase.remove(person.getId());// Add updated userdatabase.put(person.getId(), person);}}接下来就是@ModelAttribute的两种使用方法.
模式1:method级(作用于方法上)
package org.liukai.tutorial.controller;import java.util.List;import javax.annotation.Resource;import org.apache.log4j.Logger;import org.liukai.tutorial.domain.Address;import org.liukai.tutorial.service.AddressService;import org.springframework.stereotype.Controller;import org.springframework.ui.Model;import org.springframework.web.bind.annotation.ModelAttribute;import org.springframework.web.bind.annotation.RequestMapping;import org.springframework.web.bind.annotation.RequestMethod;@Controller@RequestMapping("/address")public class AddressController {protected static Logger logger = Logger.getLogger("controller");@Resource(name = "addressService")private AddressService addressService;/** * 获得所有Addresses,并使他们成为一个model. * 注意@ModelAttribute作用于method级别上时.会在@Controller执行时加载 * method里的方法.即在@Controller执行时@ModelAttribute添加参数. * 返回于该@Controller返回的所有JSP页面. */@ModelAttribute("addresses")public List<Address> getAllAddresses() {return addressService.getAll();}/** * 处理和检索一个包含addresses 的JSP Page . */@RequestMapping(value = "list1", method = RequestMethod.GET)public String getAllUsingModelAttribute() {logger.debug("Received request to show all addresses page");// 他会解析 /WEB-INF/jsp/addressespage.jspreturn "addressespage";}/** * 处理和检索一个包含addresses 的JSP Page . * * @return the name of the JSP page */@RequestMapping(value = "list2", method = RequestMethod.GET)public String getAllUsingModel(Model model) {logger.debug("Received request to show all addresses page");// 检索所有的address并装入model返回addressespage.jspmodel.addAttribute("addresses", addressService.getAll());model.addAttribute("greetings", "I came from Model not ModelAttribute");// This will resolve to /WEB-INF/jsp/addressespage.jspreturn "addressespage";}}
Controller中有一个注解为@ModelAttribute("addresses")的getAllAddresses的method
表示在JSP Page中的参数名称为addresses.
创建一个JSP页面:addressespage.jsp
addressespage.jsp
<%@ taglib uri="http://java.sun.com/jsp/jstl/core" prefix="c"%><%@ page language="java" contentType="text/html; charset=UTF-8"pageEncoding="UTF-8"%><!DOCTYPE html PUBLIC "-//W3C//DTD HTML 4.01 Transitional//EN" "http://www.w3.org/TR/html4/loose.dtd"><html><head><meta http-equiv="Content-Type" content="text/html; charset=UTF-8"><title>Insert title here</title></head><body><h1>Addresses</h1><table><tr><td width="100">Id</td><td width="150">Street</td><td width="150">City</td><td width="150">Zip Code</td></tr><c:forEach items="${addresses}" var="address"><tr><td><c:out value="${address.id}" /></td><td><c:out value="${address.street}" /></td><td><c:out value="${address.city}" /></td><td><c:out value="${address.zipCode}" /></td></tr></c:forEach></table><p>${greetings}</p></body></html>根据controller里的@RequestMapping.我们的访问路径为:
http://localhost:8080/spring-jsp/address/list1
http://localhost:8080/spring-jsp/address/list2
下面是根据address/list1得到的截图.
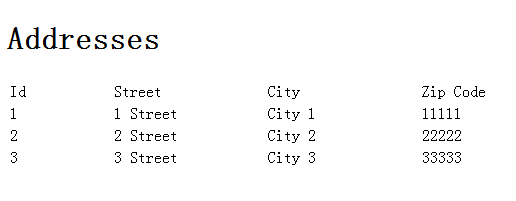
而根据address/list2得到的截图是:
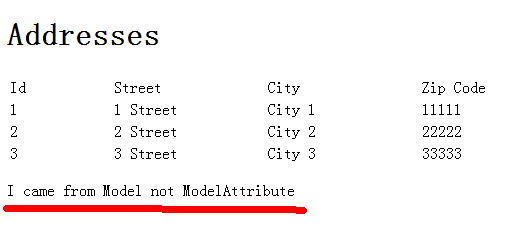
比较一下他们有什么区别?
后者是不是多了一行文字?
然后回过头看看代码.
package org.liukai.tutorial.controller;import java.util.ArrayList;import java.util.List;import javax.annotation.Resource;import org.apache.log4j.Logger;import org.liukai.tutorial.domain.Person;import org.liukai.tutorial.service.PersonService;import org.springframework.stereotype.Controller;import org.springframework.ui.Model;import org.springframework.web.bind.annotation.ModelAttribute;import org.springframework.web.bind.annotation.PathVariable;import org.springframework.web.bind.annotation.RequestMapping;import org.springframework.web.bind.annotation.RequestMethod;@Controller@RequestMapping("/main")public class MainController {protected static Logger logger = Logger.getLogger("controller");@Resource(name = "personService")private PersonService personService;/** * 获得所有Person,并使他们成为一个model. */@ModelAttribute("persons")public List<Person> getAllPersons() {logger.debug("Retrieving all persons and adding it to ModelAttribute");// Delegate to PersonServicereturn personService.getAll();}/** * 获得所有的货币类型,并使他们成为一个model. */@ModelAttribute("currencies")public List<String> getAllCurrencies() {logger.debug("Retrieving all currencies and adding it to ModelAttribute");// Prepare dataList<String> currencies = new ArrayList<String>();currencies.add("Dollar");currencies.add("Yen");currencies.add("Pound");currencies.add("Euro");currencies.add("Dinar");return currencies;}/** * 处理和检索一个包含Perosn 的JSP Page */@RequestMapping(method = RequestMethod.GET)public String getAllPage(Model model) {logger.debug("Received request to show all persons page");// personsage.jsp会引用一个名叫persons的model attribute// 我们不需要手动添加这个model// 前面他已经自动的通过@ModelAttribute("persons")进行了添加.// 他会解析 /WEB-INF/jsp/personspage.jspreturn "personspage";}/** * 检索修改页面 */@RequestMapping(value = "/edit/{id}", method = RequestMethod.GET)public String getEdit(@PathVariable Integer id, Model model) {/* * @PathVariable表示指定@RequestMapping的URL模板中{}里的值 * 相当于以前我们URL后面传的参数如XX?id=XXXX . * 但是现在我们可以用 XX/id/XX来代替. * 这个就是REST风格的URL,我们可以实现非常复杂的URL模板 */logger.debug("Received request to show edit page");/* * 根据ID检索出对应的Person,然后把检索出来的Person放入一个叫 * "personAttribute"的model中. * 这样editpage.jsp就会接收一个 名为personAttribute的参数. * 相当于request.setAttribute("XX",XX) */model.addAttribute("personAttribute", personService.get(id));// This will resolve to /WEB-INF/jsp/editpage.jspreturn "editpage";}/** * 保存修改结果 */@RequestMapping(value = "/edit/{id}", method = RequestMethod.POST)public String saveEdit(@ModelAttribute("personAttribute") Person person,@PathVariable Integer id, Model model) {logger.debug("Received request to update person");// 我们从页面接收到了一个名为"personAttribute"的model并命名为person// 同样我们也获得了指定的id.person.setId(id);// 更新personpersonService.edit(person);// 在更新后我们重新显示所有Person 的页面model.addAttribute("persons", personService.getAll());// This will resolve to /WEB-INF/jsp/personspage.jspreturn "personspage";}}
这个controller里定义了两个method级别的@ModelAttribute方法:getAllPersons和getAllCurrencies
我们已经了解了他们的用法和意义.
然后在saveEdit方法中,有个一个参数是用@ModelAttribute注解的.
@RequestMapping(value = "/edit/{id}", method = RequestMethod.POST) public String saveEdit(@ModelAttribute("personAttribute") Person person, @PathVariable Integer id, Model model) {...}表示从JSP 页面返回的一个叫"personAttribute"的值.并自动的转化为Person对象.
这样和以前我们用的request.getParameters("personAttribute")效果一样.
但是一个是操作参数对象.一个是处理请求.两者的实现思想不同.
在此controller中我们有3个映射:
/main - 检索所有的Person
/main/edit/{id} - (GET)根据ID进行检索和edit
/main/edit/{id} - (POST) 根据ID进行更新
注:后两者的URL虽然一样,
但一个是GET方法,一般用于检索.
一个是POST方法,一般用于提交表单.
如果大家有注意@RequestMapping中的method方法其实有四种.
GET
POST
PUT
DELETE
每个方法对应一个逻辑操作.对于REST风格的编程是一个相当好的补充.
关于这点感兴趣的同学可以看看springsource一篇官方BLOG:REST in Spring 3: @MVC
让我们继续完成其他的JSP
personspage.jsp
<%@ taglib uri="http://java.sun.com/jsp/jstl/core" prefix="c" %><%@ page language="java" contentType="text/html; charset=UTF-8" pageEncoding="UTF-8"%><!DOCTYPE html PUBLIC "-//W3C//DTD HTML 4.01 Transitional//EN" "http://www.w3.org/TR/html4/loose.dtd"><html><head><meta http-equiv="Content-Type" content="text/html; charset=UTF-8"><title>Insert title here</title></head><body><h1>Persons</h1><table><tr><td width="50">Id</td><td width="150">First Name</td><td width="150">Last Name</td><td width="100">Money</td><td width="50">Currency</td></tr><c:forEach items="${persons}" var="person"><tr><td><c:out value="${person.id}" /></td><td><c:out value="${person.firstName}" /></td><td><c:out value="${person.lastName}" /></td><td><c:out value="${person.money}" /></td><td><c:out value="${person.currency}" /></td></tr></c:forEach></table></body></html>这个主要是映射 /main.
editpage.jsp
<%@ taglib uri="http://java.sun.com/jsp/jstl/core" prefix="c" %><%@ taglib uri="http://www.springframework.org/tags/form" prefix="form" %><%@ page language="java" contentType="text/html; charset=UTF-8" pageEncoding="UTF-8"%><!DOCTYPE html PUBLIC "-//W3C//DTD HTML 4.01 Transitional//EN" "http://www.w3.org/TR/html4/loose.dtd"><html><head><meta http-equiv="Content-Type" content="text/html; charset=UTF-8"><title>Insert title here</title></head><body><h1>Edit Person</h1><c:url var="saveUrl" value="/main/edit/${personAttribute.id}" /><form:form modelAttribute="personAttribute" method="POST" action="${saveUrl}"><table><tr><td><form:label path="id">Id:</form:label></td><td><form:input path="id" disabled="true"/></td></tr><tr><td><form:label path="firstName">First Name:</form:label></td><td><form:input path="firstName"/></td></tr><tr><td><form:label path="lastName">Last Name</form:label></td><td><form:input path="lastName"/></td></tr><tr><td><form:label path="money">Money</form:label></td><td><form:input path="money"/></td></tr><tr><td><form:label path="currency">Currency:</form:label></td><td><form:select path="currency" items="${currencies}"/></td></tr></table><input type="submit" value="Save" /></form:form></body></html>此页面返回以下controller中的方法:
@RequestMapping(value = "/edit/{id}", method = RequestMethod.GET) public String getEdit(@PathVariable Integer id, Model model) {...}我们可以通过类似
http://localhost:8080/spring-jsp/main/edit/1
的链接进行编辑.
下面是编辑页面
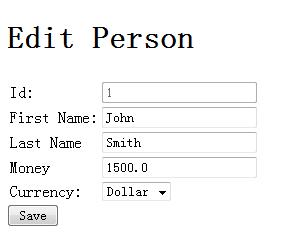
当我们编辑完提交表格,执行了下面的方法
@RequestMapping(value = "/edit/{id}", method = RequestMethod.POST) public String saveEdit(@ModelAttribute("personAttribute") Person person, @PathVariable Integer id, Model model) {...}整个项目的目录结构如下
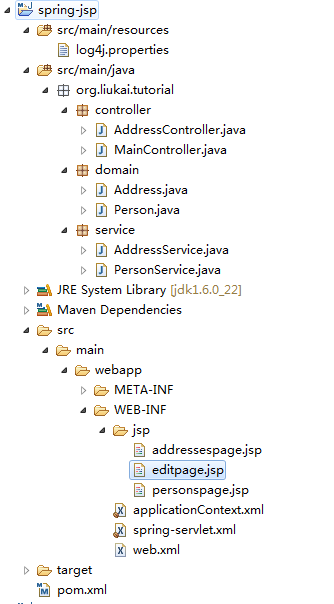
总结:我们完成一个基于spring3MVC的应用程序.
并且了解了@ModelAttribute的两种使用模式.
一个是作用于method级别,
一个是用作method里的参数.
BTW:附件为本次教程源码.你可以下载后直接在tomcat或其他web服务器启动.也可以自行添加
maven插件启动.
