部署ZK到OSGi框架
TOC March
March  New Features of ZK Studio 1.0.2 Integrate ZK5 with Spring 3 and Hibernate
 March
March  New Features of ZK Studio 1.0.2 Integrate ZK5 with Spring 3 and Hibernate
?
?
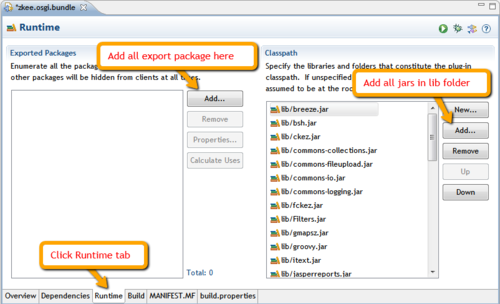
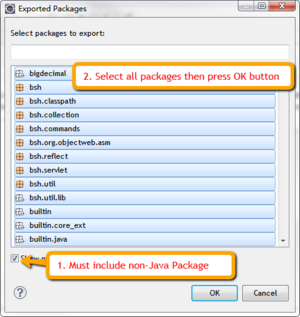
Open MANIFEST.MF file to modify the OSGi Bundle attributes- Click Runtime tab. In Classpath panel, add all jars in lib folder. In Export Packages add all packages that zk jars provided, include non-java packages.
 The Export Packages will miss "web.WEB-INF.tld.web" and "web.WEB-INF.tld.zk" that have to added manually in MANIFEST.MF tab.
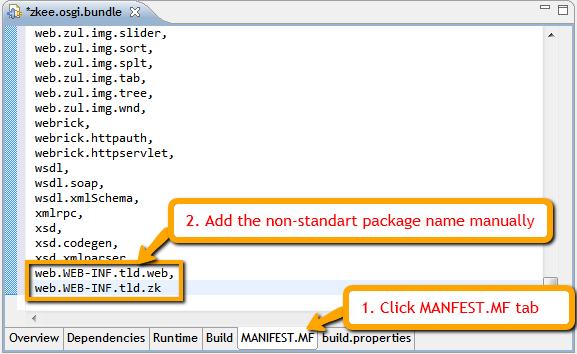 Go back the Runtime tab, in Export Package panel, click Calculate Uses to analyze the package usage. This operation will take almost an half hour or more to finish ( you can remove the jars you don't need to speed it up).Click Dependencies tab. In Imported Packages panel, add necessary import package here. Depending on the OSGi container you are using, the required import packages may be different. Here are the minimum required packages:javax.servlet;version="2.5.0"javax.servlet.http;version="2.5.0"javax.swing.filechooserjavax.xml.parsersjavax.xml.transformjavax.xml.transform.domjavax.xml.transform.streamorg.w3c.domorg.xml.saxorg.xml.sax.extorg.xml.sax.helpers
 Click the Contents tab then type the Version info and save the changes.
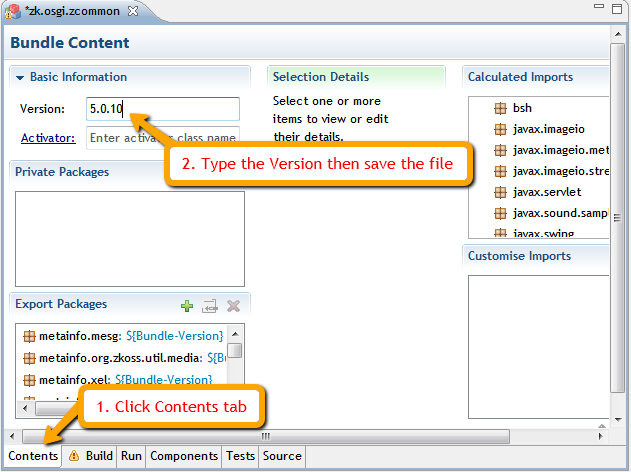 Check the generated jar, and that is the OSGi bundle we want.
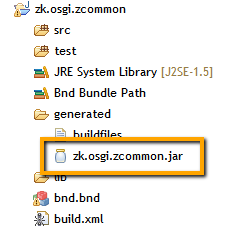 Repeat step 2 for all ZK jars.Here you can copy all the generated jars into the repository of the OSGi container, orWrap all the generated jars into one OSGi bundle by Eclipse Plug-in Project described above without the Calculate Uses step.Note: this option is recommended for ease of use.
With BndTools, we can convert ZK jars into OSGi bundle quickly, and it will prepare import packages automatically, where with Eclipse Plug-in Project we need to specify import packages by ourselves. However, one thing to note is that with BndTools we have to wrap ZK jar files one by one because the Export Packages are duplicate due to duplicated package name, such as metainfo.zk.
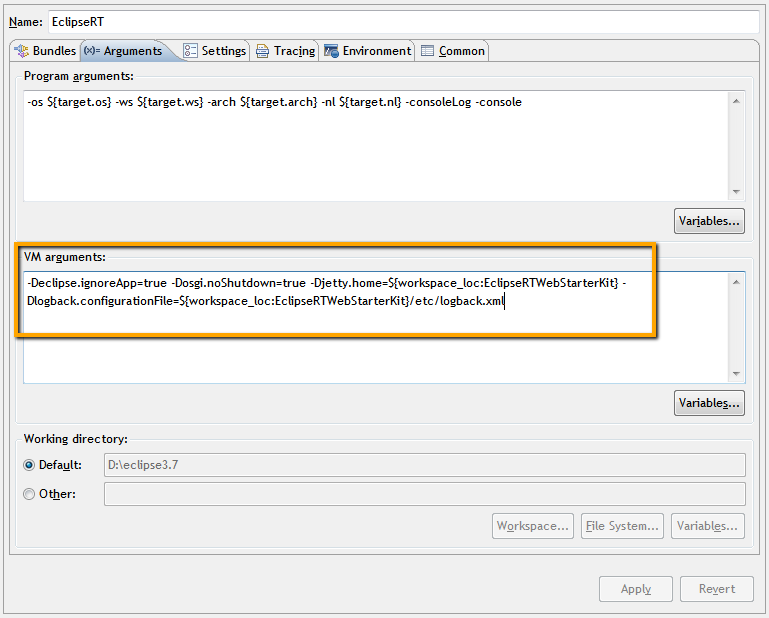
Export the project by Eclipse Deployable plug-ins and fragments wizard. The final project structure: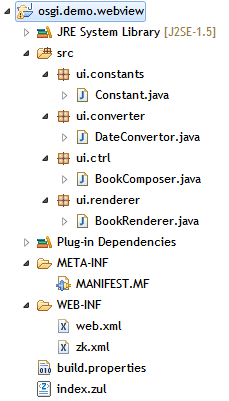 Export the project by Eclipse Deployable plug-ins and fragments wizard. Right click the osgi.demo.webview project -> Run -> Run Configuration... -> OSGi FrameworkIn order to make sure the bundle start sequence, set the start level in Bundles tab.Add additional VM arguments In the (x)= Arguments tab.
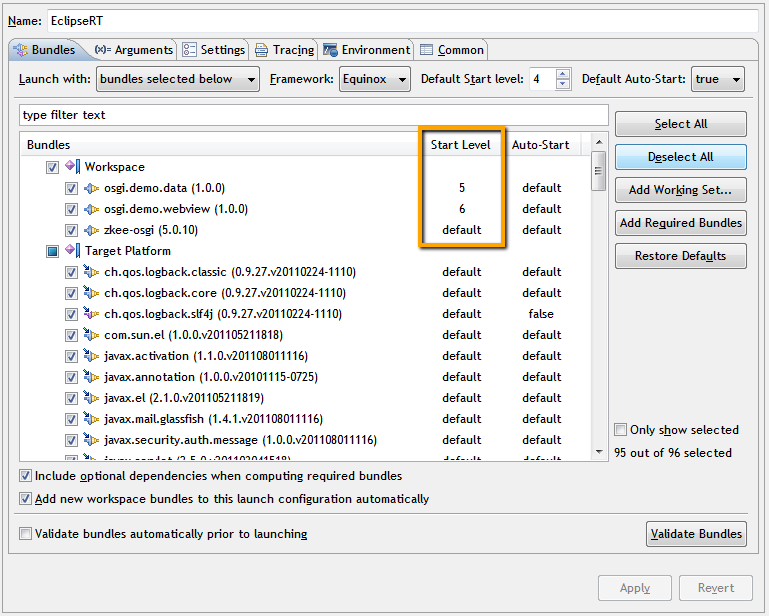
 Click Run buttonIn the Eclipse Console it will show osgi console. You can Type "help" command to show the command list and usage.In the osgi console type "ss" command, if you see all bundle is INSTALLED status. Close the console and then re-run OSGi framework again.Visit http://localhost:8080/osgidemo/index.zul to see the result.You can keep changing the code without terminating OSGi framework, just type "restart BundleID" in osgi console to see the changes. Visit http://localhost:8181/osgidemo/index.zul to see the result.Note: if you cannot see the correct result, it might be caused by the wrong bundle installation sequence. You can try to use the following command to fix the problem.Find the webview bundle ID:Restart the bundle:1
web:list1osgi:restart BundleID EclipseRT Virgo The Virgo Web Server from EclipseRT is a completely module-based Java application server that is designed to run enterprise Java applications and Spring-powered applications with a high degree of flexibility and reliability. It offers a simple yet comprehensive platform to develop, deploy, and service enterprise Java applications.[5]
Steps to deploy the project- Download EclipseRT Virgo from http://eclipse.org/virgo/download/.Follow the user guide to install and start the server.Open the Web Admin Console via http://localhost:8080/admin with default account/password(admin/springsource)Follow the bundle installation guide hereDeploy the three bundles one by one with the following sequence.zkee-osgi_5.0.10.jarosgi.demo.data_1.0.0.jarosgi.demo.webview_1.0.0.jarVisit http://localhost:8080/osgidemo/index.zul to see the result.
The OSGi standard provides powerful modularization and version control which I think is very convenient for developers to control the bundle versions with various functions, and can help developers to design the skeleton of the project with loose coupling. Also it reduces the time for restarting the server during development phase. Following this article you should be able to convert ZK jar files into OSGi bundles and start your first OSGi-supported application.
DownloadDownload the sample bundles:
zkee-osgi_5.0.10.jarosgi.demo.data_1.0.0.jarosgi.demo.webview_1.0.0.jar Reference- ↑ Erko Knoll's article: Small_Talks/2011/December/ZK_OSGi_-_Developing_plug-in_based_applications_with_OSGi↑ Some OSGi containers will read Webapp-Context attribute instead of reading standard Web-ContextPath attribute so here we define both attributes for compatibility.↑ Eclipse Equinox: http://eclipse.org/equinox/ Eclipse↑ Apache ServiceMix: http://servicemix.apache.org/↑ EclipseRT Virgo: http://eclipse.org/virgo/