android布局与源码横向线性布局加relativeLayoutpublic void onCreate(Bundle savedInstanceState) {super
android布局与源码
横向线性布局加relativeLayout
public void onCreate(Bundle savedInstanceState) {super.onCreate(savedInstanceState);LinearLayout layoutMain = new LinearLayout(this);layoutMain.setOrientation(LinearLayout.HORIZONTAL);setContentView(layoutMain);LayoutInflater inflate = (LayoutInflater) getSystemService(Context.LAYOUT_INFLATER_SERVICE);//xml加载器RelativeLayout layoutLeft = (RelativeLayout) inflate.inflate(R.layout.left, null);RelativeLayout layoutRight = (RelativeLayout) inflate.inflate(R.layout.right, null);RelativeLayout.LayoutParams relParam = new RelativeLayout.LayoutParams(RelativeLayout.LayoutParams.WRAP_CONTENT,RelativeLayout.LayoutParams.WRAP_CONTENT);layoutMain.addView(layoutLeft, 100, 100);//先加入第一个相对布局的xml,并规定宽度和高度layoutMain.addView(layoutRight, relParam);//剩下的空间由这个相对布局xml填充}-----------------------------------
LinearLayout ,
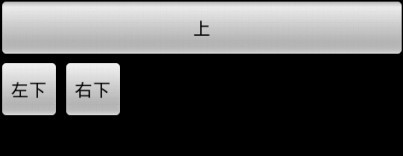
<Button android:layout_width="fill_parent" android:layout_height="fill_parent" android:text="上" /><LinearLayout xmlns:android="http://schemas.android.com/apk/res/android" android:orientation="horizontal" android:layout_width="wrap_content" android:layout_height="wrap_content" > <Button android:layout_width="wrap_content" android:layout_height="wrap_content" android:text="左下" /> <Button android:layout_width="wrap_content" android:layout_height="wrap_content" android:text="右下" /> </LinearLayout>
---------------------------
Table布局

<TableLayout xmlns:android="http://schemas.android.com/apk/res/android" android:layout_width="fill_parent" android:layout_height="fill_parent" ><TextView android:layout_width="fill_parent" android:layout_height="wrap_content" android:gravity="center" android:text="表头"/><TableRowandroid:gravity="center"><TextViewandroid:layout_width="wrap_content"android:layout_height="wrap_content"android:text="第0列" --android:layout_marginLeft="10dip"></TextView><TextViewandroid:layout_width="wrap_content"android:layout_height="wrap_content"android:text="第1列"></TextView></TableRow><TableRowandroid:gravity="center"><Buttonandroid:layout_width="wrap_content"android:layout_height="wrap_content"android:text="按钮1"/><Buttonandroid:layout_width="wrap_content"android:layout_height="wrap_content"android:text="按钮2"/></TableRow></TableLayout>
------------------------------------------------------
相对布局

<RelativeLayout xmlns:android="http://schemas.android.com/apk/res/android" android:layout_width="fill_parent" android:layout_height="fill_parent" > <Button android:id="@+id/button1" android:layout_width="wrap_content" android:layout_height="wrap_content" android:text="中间的按钮,很长很长很长" android:layout_centerInParent="true" > </Button> <Button android:id="@+id/button2" android:layout_width="wrap_content" android:layout_height="wrap_content" android:text="上面的按钮" android:layout_above="@id/button1" android:layout_alignLeft="@id/button1" > </Button> <Button android:id="@+id/button3" android:layout_width="wrap_content" android:layout_height="wrap_content" android:text="下面的按钮" android:layout_below="@id/button1" android:layout_alignRight="@id/button1" --android:layout_alignParentRight="true" 这个也常用 > </Button> </RelativeLayout>
----------------------------------------------
Frame布局

<FrameLayout xmlns:android="http://schemas.android.com/apk/res/android" android:layout_width="fill_parent" android:layout_height="fill_parent" > <ImageView android:layout_width="wrap_content" android:layout_height="wrap_content" android:src="@drawable/big" > </ImageView> <ImageView android:layout_width="wrap_content" android:layout_height="wrap_content" android:src="@drawable/center" > </ImageView> <ImageView android:layout_width="wrap_content" android:layout_height="wrap_content" android:src="@drawable/small" > </ImageView> </FrameLayout>
----------------------------------
对于每种布局,都有专属的xml语句,有些xml就、语句是在其他地方运行不出来的
FrameLayout
如果要在FrameLayout里面调整控件的位置,
在他下属的控件或者是layout里面 android:layout_gravity="bottom"(也可以是top~~~)是最好用的
注意:android:layout_gravity="left"这个属性似乎在哪里都可以用,就是本布局与上一布局的关系。
RelativeLayout:
下属控件用:android:layout_centerHorizontal="true" 居中
android:layout_alignParentLeft
android:layout_toLeftOf
android:layout_alignLeft
LinearLayout
<LinearLayout android:orientation="vertical"
android:gravity="center" ----这是让他下面的组件居中
android:layout_height="wrap_content" android:layout_width="fill_parent"
android:layout_gravity="bottom" android:background="#80000000">