在HTTP容器中内嵌OSGI容器Equinox
上一篇中讲了怎么在Equinox中嵌入Http容器和添加Http服务。
?
这一篇讲另半部分:怎么在HTTP容器(如Tomcat)中嵌入Equinox。
?
一、入门Equinox工程里已经提供了一个专门用于连接Servlet容器和Equinox容器的war包,可以从以下位置下载:
http://eclipse.org/equinox/server/downloads/bridge.war
?
把它放在Tomcat的webapp下,启动Tomcat,解开后得到的目录结构为:
?
?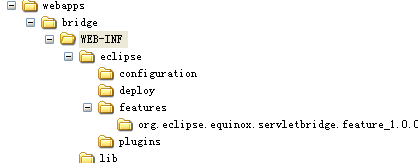
可以看到这其中已经有一个eclipse的目录结构,和平时添加插件一样,只要把我们新建的bundle放到plugins目录下,即可。
?
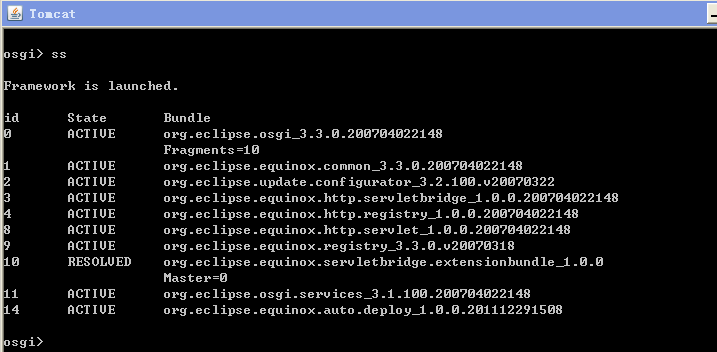
安装完这个war后,启动tomcat,待tomcat启动后,在console上按几下回车,就可以得到osgi控制台了,如下:
?
测试一下:把上一篇文章中得到的bundle放到plugins目录下,然后重启tomcat,再试式ss命令,看看是否已经安装成功。
?
可以看到,要在Http容器里嵌入Equinox非常简单。
?
不过有一个比较重大的问题:插件不会自动更新,例如一旦tomcat启动后,再有新的插件扔进plugins目录下,它不会被自动加载和启动,必须把tomcat重启,才能生效。
二、自动加载我也不知道怎么配置就可以自动加载,然后我又想要这个功能,没办法就只能自己写了。
假设在eclipse下定义一个新的目录deploy,每隔一段时间就去扫描这个deploy目录,如果有文件或文件夹,就试图把它(它们)作为一个bundle去安装、启动,然后它bundle从deploy目录下移到plugins目录下。
?
所以,我们需要有一个新的插件,用来扫描deploy目录并且安装和启动找着的bundle;然后我们把这个插件让到plugins里,让它随着tomcat启动而启动。
?
剩下的事情就是怎么实现这个bundle了。
?
1.定期扫描
new Thread() {@Overridepublic void run() {File deployFolder = getDeployFolder();File pluginsFolder = getPluginsFolder();while (Activator.context != null) {try {sleep(50000);} catch (InterruptedException e) {e.printStackTrace();}deployAllUnder(deployFolder, pluginsFolder);}}}.start();?2.安装和启动
private void deployAllUnder(File deployFolder, File pluginsFolder) {File[] listFiles = deployFolder.listFiles();for (File f : listFiles) {try {System.out.println("installing bundle" + f.getName() + " ...");Bundle installBundle = context.installBundle("file:"+ f.getAbsolutePath());System.out.println("Installed Bundle " + f.getName()+ " successful");moveInstalled2Plugins(f, pluginsFolder);removeInstalledFile(f);System.out.println("Starting bundle " + f.getName() + " ...");installBundle.start();System.out.println("Started bundle " + f.getName());} catch (BundleException e) {System.out.println("Failed to install " + f.getName());e.printStackTrace();}}}?
3.移动和删除
private boolean moveInstalled2Plugins(File f, File pluginsFolder) {return f.renameTo(new File(pluginsFolder, f.getName()));}private boolean removeInstalledFile(File f) {if (f.isFile()) {return f.delete();} else if (f.isDirectory()) {File[] listFiles = f.listFiles();for (File sub : listFiles) {boolean removeFile = removeInstalledFile(sub);if (!removeFile) {return false;}}return f.delete();}return true;}?
4.得到deploy和plugins目录
private File getDeployFolder() {String location = context.getBundle().getLocation();URI uri = URI.create(location.replace("\", "/"));File file = new File(uri.getSchemeSpecificPart());File eclipseFolder = file.getParentFile().getParentFile();File deployFolder = new File(eclipseFolder, DEPLOY_FOLDER_NAME);if (!deployFolder.exists() || !deployFolder.isDirectory()) {deployFolder.mkdir();}return deployFolder;}private File getPluginsFolder() {String location = context.getBundle().getLocation();URI uri = URI.create(location.replace("\", "/"));File file = new File(uri.getSchemeSpecificPart());return file.getParentFile();}?
完了以后,以后每次有新的bundle,只需要放到deploy目录下即可,过一会就会被扫描到并且被自己安装和启动。