andoid学习笔记
安卓主流分辨率:
layout-320X240, 480X320, 800X480, 854X480, 960X640, ?1024X600 .为简单起见,Android将屏幕尺寸(屏幕从左上角到右下角的对角线长度)分为四个级别:小,正常,大和超大,?将屏幕密度分成四个基本密度:lDPI(低),mDPI(中等),hDPI(高)以及 xhDPI(特高).?基线”布局设置在320×480(HVGA)上,?一半大小的VGA,?是目前智能手机的标准显示大小。iPhone 3GS,3G和2G都使用这一相同的配置。
android:padding:
padding是站在父view的角度描述问题,它规定它里面的内容必须与这个父view边界的距离。margin则是站在自己的角度描述问题,规定自己和其他(上下左右)的view之间的距离.例如设置EditText中的文字距离边框的填充,就可以使用padding,设置这个EditText在父容器中的位置可以用margin。
android:singleLine="true" :
设置单行显示。经常与android:maxWidth配合使用,设置文本的最大宽度,超出部分以...的形式显示,如:android:text="test_ singleLine "android:singleLine="true"android:maxWidth="60.0dp"android:layout_height="wrap_content"android:layout_width="wrap_content"如果不设置singleLine或者设置为false,文本将自动换行。
android:hint ="@string/..." :
添加灰色提示,有输入时自动消除. 例如:登录EditText框中灰色的"请输入账号..",获得焦点即清空。
android:gravity
意思是这个控件自己的“重力”,在通俗点就是控件上面的东西的位置(图片,文本等)例如:控件内文字置于左下: android:gravity=" left| bottom "
android:layout_gravity:类似android:gravity,但指的是该控件相对于父view的位置。
RelativeLayout相对布局中常用属性:?①指定控件在容器中的相对位置,包括:android:layout_alignParentTop, android:layout_alignParentBottom,android:layout_alignParentLeft,android:layout_alignParentRight,android:layout_centerHorizontal, android:layout_centerVertical, android:layout_centerInParent,他们的值是false|true。配合使用android:layout_marginBottom、Top、Left、Right 可以精确的将控件拜访在靠近容器某个边的位置。eg:
<ProgressBarandroid:id="@+id/loading"android:visibility="invisible"android:layout_width="50.0dip" android:layout_height="50.0dip"android:layout_alignParentBottom="true"android:layout_marginBottom="125.0dip" android:layout_centerHorizontal="true" style="@style/progressloadingstyle"/>?ProcessBar将水平居中显示在距离容器底部125dip的位置,如果不加layout_alignParentBottom="true",android:layout_marginBottom不起作用。
?②相对其他控件的位置:android:layout_above,?android:layout_below, ? ? ? //不定在正上或正下(同一列)android:layout_toLeftOf, ???android:layout_toRightOf ?//不一定在正左或正右(同一行)
?③和其他控件的对齐方式:android:layout_alignTop,android:layout_alignBottom, android:layout_alignLeft, android:layout_alignRigh,android:layout_alignBaseline //使在同一行 ,一般用于label的对齐,eg:让A居中显示,使用该属性将B对齐在A上,如果还有其他控件需要指定相对位置,最好继续以A为参照物,以B为参照物会出问题。
eg:
<RelativeLayout xmlns:android="http://schemas.android.com/apk/res/android" android:id="@+id/view" android:background="@drawable/background_login" android:layout_width="match_parent" android:layout_height="match_parent"> <TextView android:id="@+id/text1"android:layout_width="fill_parent"android:layout_height="wrap_content"android:textColor="#000000"android:text="TextView1"/><TextView android:id="@+id/text2"android:layout_below="@id/text1"android:layout_width="wrap_content"android:layout_height="wrap_content"android:textColor="#000000"android:text="TextView2"/><EditTextandroid:id="@+id/edit1"android:layout_toRightOf="@id/text2"android:layout_width="wrap_content"android:layout_height="wrap_content"android:layout_alignTop="@id/text2"/> </RelativeLayout>?效果图:
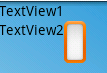 将EditText中android:layout_alignTop="@id/text2"改为android:layout_alignBottom="@id/text2",为TextView2和EditText底端对齐,效果变为:
alignWithParentIfMissing = "true|false"
针对RelativeLayout有一点需要注意,因为它内部是通过多个View之间的关系而确定的框架,那么当其中某一个View因为某些需要调用GONE 来完全隐藏掉后,会影响与其相关联的Views。Android为我们提供了一个属性 alignWithParentIfMissing ?用于解决类似问题,当某一个View无法找到与其相关联 的Views后将依据alignWithParentIfMissing 的设定判断是否与父级View对齐。
android:visibility:
此属性意思是此视图是否显示,例如RelativeLayout中?android:visibility="gone"。其有三个属性:visible显示;invisible显示黑背景条;gone不显示在类中,可以设置其显示与否,setVisibility(View.GONE); ? ? 不显示setVisibility(View.VISIBLE); ? 显示
android:ellipsize: ? 内容过长加省略号的位置
android:ellipsize = "end" ?省略号在结尾android:ellipsize = "start" 省略号在开头android:ellipsize = "middle" ? ? 省略号在中间android:ellipsize = "marquee" ?跑马灯最好加一个约束android:singleline = "true"也可以用代码语句 :tv.setEllipsize(TextUtils.TruncateAt.valueOf("END"));tv.setEllipsize(TextUtils.TruncateAt.valueOf("START"));tv.setEllipsize(TextUtils.TruncateAt.valueOf("MIDDLE"));tv.setEllipsize(TextUtils.TruncateAt.valueOf("MARQUEE"));最好再加一个约束tv.setSingleLine(true);不仅对于textview有此属性,对于editext也有,不过它不支持marquee
android:inAnimation和android:outAnimation:分别指定View进出使用的动画效果。? eg:? ? ? ? android:inAnimation="@android:anim/slide_in_left"? ? ? ? android:outAnimation="@android:anim/slide_out_right" //从左边进右边飞出的效果
※ 始终使用sp作为文字大小的单位,将dp或dip作为其他元素的单位.
xml中的<![CDATA[ 与 ]]> :
在xml中,一些特殊的字符,是不能被直接解析的, 需要放入到CDATA中让XML解析器忽略它! 这里的忽略并不是说throws掉, 而仅仅是作为普通文本进行处理。这些带有CDATA的XML最好采用android自带的pullxmlParser解析,用sax容易产生错误。
资源访问:
对于sdcard中的本地网页和图片等资源,一般url地址以 "file:///mnt/sdcard/"开头; 对于android项目中assets目录下的本地网页和图片等资源,url以"file:///android_asset/?"开头;
错误:java.lang.IllegalStateException: ScrollView can host only one direct child
ScrollView内部只能有一个子元素,即不能并列两个子元素,所以需要把所有的子元素放到一个LinearLayout内部或 ? ? RelativeLayout等其他布局方式。
? ? ??listview设计UI的相关属性:? ? ?stackFromBottom属性:设置该属性之后你做好的列表就会显示你列表的最下面,值为true和false ? ? ? ? ? ? ? ? ? ?? ? ? ?android:stackFromBottom="true" ; ? ? ? ? ??? ? transciptMode属性,需要用ListView或者其它显示大量Items的控件实时跟踪或者查看信息,并且希望最新
? ? ? ? 的条目可以自动滚动到可视范围内。通过设置的控件transcriptMode属性可以将Android平台的控件
? ? ? (支持ScrollBar)自动滑动到最底部。android:transcriptMode="alwaysScroll" ?; ?
cacheColorHint属性,很多人希望能够改变一下它的背景,使他能够符合整体的UI设计,改变背景背很简单只需要
准备一张图片然后指定属性?android:background="@drawable/bg",不过不要高兴地太早,当你这么做以后,
发现背景是变了,但是当你拖动,或者点击list空白位置的时候发现ListItem都变成黑色的了,破坏了整体效果。如果
你只是换背景的颜色的话,可以直接指定android:cacheColorHint为你所要的颜色,如果你是用图片做背景的话,
那也只要将android:cacheColorHint指定为透明(#00000000)就可以了
divider属性,该属性作用是每一项之间需要设置一个图片做为间隔,或是去掉item之间的分割线
android:divider="@drawable/list_driver" ?其中 ?@drawable/list_driver 是一个图片资源,如果不想
? ? ? ? 显示分割线则只要设置为android:divider="@drawable/@null" 就可以了
? ? ? ?fadingEdge属性,上边和下边有黑色的阴影,android:fadingEdge="none" 设置后没有阴影了。
scrollbars属性,作用是隐藏listView的滚动条,android:scrollbars="none"与
setVerticalScrollBarEnabled(true);的效果是一样的,不活动的时候隐藏,活动的时候也隐藏
fadeScrollbars属性,android:fadeScrollbars="true" ?配置ListView布局的时候,设置这个属性为true就可以
实现滚动条的自动隐藏和显示。
android:listSelector属性,默认是橘黄色的 (不少手机厂商都把这个默认修改了,g3好像默认是绿色..)作用是展示一个写好的selecter.xml,效果与在list的每个子项布局文件中指定根view的background为selecter一样。
使用代码显示一个圆形等待进度条:
processDialog = new ProgressDialog(Context context);processDialog.setMessage(String message);processDialog.setIndeterminate(false);processDialog.setCancelable(true);processDialog.setOnCancelListener(mOnCancelListener);processDialog.show();ProgressBar的setIndeterminate(false);设为false,表示滚动条的当前值自动在最小到最大值之间来回移动,形成这样一个动画效果,这个只是告诉别人"我正在工作",但不能提示工作进度到哪个阶段。主要是在进行一些无法确定操作时间的任务时作为提示。设为true,就是根据你的进度可以设置现在的进度值。
简单的连接等待Dialog: myDialog = ProgressDialog.show(LoginAct.this, "正在连接服务器..","连接中,请稍后..", true, true);
ActivityManager.restartPackage:退出系统
? ? 用于Android2.2以下版本:
ActivityManager am = (ActivityManager)getSystemService (Context.ACTIVITY_SERVICE); am.restartPackage(getPackageName());? ?这个方法,系统会将该包下的所有 进程、服务,全部杀掉,要注意清单文件:
? ?<uses-permission android:name="android.permission.RESTART_PACKAGES"></uses-permission>??
用于Android2.2 版本:
Intent startMain = new Intent(Intent.ACTION_MAIN);startMain.addCategory(Intent.CATEGORY_HOME); startMain.setFlags(Intent.FLAG_ACTIVITY_NEW_TASK);startActivity(startMain);System.exit(0);//退出程序???
设置Activity的横竖屏:
<activity android:name=".EX01" android:label="@string/app_name" android:screenOrientation="portrait">// 竖屏 , 值为 landscape 时为横屏………… </activity>
事件监听:有些事件处理方法没有返回值,但有些事件处理方法是必须带返回值,例如onLongClick()它返回的布尔值表明你已经完成了这个事件的处理,还是应该把它继续传下去。返回true表明已经处理完成并且停止了传递,如果返回为false表明事件还没有完成,或者它还需要继续被传递给其他的监听器example:
private int m_id;private int m_position;mlistView.setOnItemLongClickListener(new OnItemLongClickListener() {@Overridepublic boolean onItemLongClick(AdapterView<?> arg0, View v,int position, long id) {m_id = id;m_position = position;return false; //交给onContextItemSelected继续做}});@Overridepublic boolean onContextItemSelected(MenuItem item) {if(item.getItemId() == 0){//打开Intent intent = new Intent(Myself.this, SubList.class);intent.putExtra("mid", m_id);String m_name = myObjectList.get(m_position-1).getName(); intent.putExtra("mname", m_name);startActivity(intent);}else if(item.getItemId() == 1){//删除}return super.onContextItemSelected(item);}@Overridepublic void onCreateContextMenu(ContextMenu menu, View v, ContextMenuInfo menuInfo) { super.onCreateContextMenu(menu, v, menuInfo); //menu.setHeaderIcon(R.drawable.icon); // 创建上下文菜单 menu.setHeaderTitle("请选择操作"); //menu.clearHeader(); //清除表头 // 第一个参数:组ID // 第二个参数:菜单项ID // 第三个参数:顺序号 // 第四个参数:菜单项上显示的内容 menu.add(1,0,0,"打开"); menu.add(1,1,1,"删除");}?代码中如果setOnItemLongClickListener返回了true,onCreateContextMenu方法就不会执行,长按listview的某个item也就不会构建并弹出上下文菜单。在Android 框架中会调用event handlers先处理事件,然后会适当的传递给二级默认的预定义handlers中;因此如果返回true,将会停止这个事件的传递,View中默认事件处理方法的回调也会被阻止。因此,当你返回true肯定表明你是要终止这个事件的延续。
org.apache.harmony.xml.ExpatParser$ParseException: At line 1, column 0: no element found原因是is = method.getResponseBodyAsStream();//String str = method.getResponseBodyAsString();本来想打印str观察返回的xml是否正确。就因为加了这句,导致了错误,网上的解释:流不能被重复读取。
<meta name="format-detection" content="telephone=no">禁掉webview的自动识别电话号码的功能。
webview显示一个html文件的时候,右边总是有一个白色的边框,如何去掉:在xml中加入android:scrollbarSize="0dip" 或者?webView.setScrollBarStyle(View.SCROLLBARS_INSIDE_OVERLAY)
如何在wap网页或webview加载的html页面中让不同分辨率手机自适应页面宽度,防止出现横向滚动:
<meta name=”viewport” content=”width=device-width, initial-scale=1.0, minimum-scale=1.0, maximum-scale=1.0″>?width表示网页的布局layout宽度。initial-scale表示初始时的缩放比例,minimum-scale和maximum-scale分别表示最小和最大缩放比例。width只是设置layout宽度,还要乘上缩放比例,才能得到最终的显示宽度。那么对于480像素的屏幕来说,若device-width“被320”,那initial-scale应该是1.5才能占满整个屏幕宽度。
<meta name="MobileOptimized" content="240" />这个可以解决flash不能全屏的问题,自己没遇到过
BitmapDrawable bitmapDrawable = new BitmapDrawable(new URL(url).openStream());?从网络上直接获取图片加载到本地内存中,需要新开线程。
android:scaleType="centerInside":在使用相对布局显示图片的时候,经常需要在ImageView中加载网络图片,宽高属性都是wrap_content,图片的大小不一定,会造成ImageView的宽或高被撑开,除了显示的图片外,还显出很大一块空白在里头,解决方案是指定ImageView的属性:
android:scaleType="centerInside"android:adjustViewBounds="true"注意:控制的图片为资源而不是背景,即android:src。关于ImageView的更多属性,参考:http://www.cnblogs.com/over140/archive/2011/06/08/2075054.html
BitmapFactory.Options如果该值设为true,将不返回实际的bitmap,不给其分配内存空间,只返回一些解码边界信息(即图片大小信息)。options.outHeight 获取图片原始高度options.outWidth 获取图片的原始宽度eg:
FrameLayout fr=(FrameLayout)findViewById(R.id.FrameLayout01); BitmapFactory.Options options = new BitmapFactory.Options(); options.inJustDecodeBounds = true; Bitmap bitmap = BitmapFactory.decodeFile("/sdcard/test.jpg", options); //此时返回bm为空 options.inJustDecodeBounds = false; //缩放比 int be = (int)(options.outHeight / (float)200); if (be <= 0) be = 1; options.inSampleSize = be; //重新读入图片,注意这次要把options.inJustDecodeBounds 设为 false哦 bitmap=BitmapFactory.decodeFile("/sdcard/test.jpg",options); int w = bitmap.getWidth(); int h = bitmap.getHeight(); System.out.println(w+" "+h); ImageView iv=new ImageView(this); iv.setImageBitmap(bitmap);这样我们就可以读取较大的图片而不会内存溢出了。如果你想把压缩后的图片保存在Sdcard上的话就很简单了:File file=new File("/sdcard/feng.png"); try { FileOutputStream out=new FileOutputStream(file); if(bitmap.compress(Bitmap.CompressFormat.PNG, 100, out)){ out.flush(); out.close(); } } catch (FileNotFoundException e) { // TODO Auto-generated catch block e.printStackTrace(); } catch (IOException e) { // TODO Auto-generated catch block e.printStackTrace(); }?压缩图片质量:?bitmap.compress(Bitmap.CompressFormat.JPEG, quality, fos); 其中的quality为0~100, 可以压缩图片质量, 不过对于大图必须对图片resize 这个是等比例缩放: bitmap = Bitmap.createScaledBitmap(bitmap, width, height, false); 这个是截取图片某部分: bitmap = Bitmap.createBitmap(bitmap, x, y, width, height);?