android ListView之一:Adapter介紹與使用(转)?点击查看原网页ListView是在Android很常見的一種視圖,ListVi
android ListView之一:Adapter介紹與使用(转)
?
点击查看原网页
ListView是在Android很常見的一種視圖,ListView不論在電話簿中還是觀看大量的列表資料,都是會用得到。
ListView的使用需要搭配Adapter,Adapter是用來連接資料和ListView的,Adapter除了會用到ListView中,另外會用到還有Spinner(類似下拉選單)的這個元件中。在Google IO 2009的其中一張投影片中,可以很清楚的看到其中的關係圖: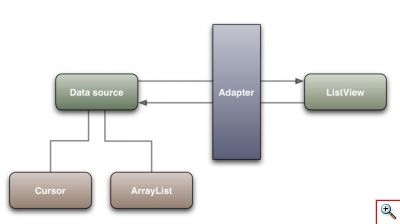 從這張圖就可以看到Adapter基本上會分成Cursor類和ArrayList類的。Cursor和資料庫或目前電話中的資料有關,例如要抓出目前電話簿中的聯絡人資料,用的就是Cursor的Adapter,而自己在程式中建立的陣列資料,用的就會是ArrayList類的Adapter。最常用的有幾種Adapter:
- ArrayAdapter:將一組數組連繫到ListView
- SimpleAdapter:適用於自訂ListView外觀的應用場合
- BaseAdapter:抽象類別,所以有多個方法需要實作。適用於需要自訂ListView外觀等靈活應用的場合。
- SimpleCursorAdapter:將一組現有的資料庫或聯絡人等ContentProvider的資料查詢的結果連繫到ListView中首先,要使用ListView可以用ListView這個UI組件,放置到目前的Activity中。另一個可以用的方式,是直接繼承ListActivity,這是一個Activity的子類,其中就會包含一個全螢幕的ListView物件。ListActivity用法比較簡單:
1234567891011121314151617181920212223242526
public class ListDemo1 extends ListActivity { /** Called when the activity is first created. */ @Override public void onCreate(Bundle savedInstanceState) { super.onCreate(savedInstanceState);? //注意:不能使用main中的layout,用了會出現錯誤 //setContentView(R.layout.main);? setListAdapter(new ArrayAdapter<String>(this, android.R.layout.simple_list_item_1, mStrings));? //啟用按鍵過濾功能 getListView().setTextFilterEnabled(true); }? private static final String[] mStrings = new String[] { "大餅包小餅", "蚵仔煎", "東山鴨頭", "臭豆腐", "潤餅", "豆花", "青蛙下蛋","豬血糕", "大腸包小腸", "鹹水雞", "烤香腸","車輪餅","珍珠奶茶","鹹酥雞","大熱狗", "炸雞排","山豬肉","花生冰","剉冰","水果冰", "包心粉圓","排骨酥","沙茶魷魚","章魚燒","度小月", "aaa","abc","bbb","bcd","123" };}?
第8行:這個是對照一般的Activity中有的setContentView方法,因為是ListActivity所以不需要,用了也會有錯誤訊息。第10行:用setListAdapter方法設定一個ArrayAdapter第14行:按鍵過濾功能,因為List中的項目有可能很多,像這個範例你按下鍵盤中的a,就會出現以a開頭的項目,方便找到項目第18~25行:一些要放到List中的字串值假設是在Activity中除了ListView之外,還要放入其他的組件時,這時候就需要在Activity中加入一個ListView組件,利用這個組件的setAdapter來連接Adapter,範例如下:12345678910111213141516171819202122232425262728
public class ListDemo2 extends Activity { /** Called when the activity is first created. */ @Override public void onCreate(Bundle savedInstanceState) { super.onCreate(savedInstanceState);? //使用main中的layout setContentView(R.layout.main); //找到listview組件 ListView list = (ListView) findViewById(R.id.listView1);? //listview物件使用setAdapter方法(比對ListActivity是用setListAdapter) list.setAdapter(new ArrayAdapter<String>(this, android.R.layout.simple_list_item_1, mStrings));? //啟用按鍵過濾功能(直接用listview物件,不需要getListView方法) list.setTextFilterEnabled(true); }? private static final String[] mStrings = new String[] { "大餅包小餅", "蚵仔煎", "東山鴨頭", "臭豆腐", "潤餅", "豆花", "青蛙下蛋","豬血糕", "大腸包小腸", "鹹水雞", "烤香腸","車輪餅","珍珠奶茶","鹹酥雞","大熱狗", "炸雞排","山豬肉","花生冰","剉冰","水果冰", "包心粉圓","排骨酥","沙茶魷魚","章魚燒","度小月", "aaa","abc","bbb","bcd","123" };}?
值得一提的是在ArrayAdapter中有一個android定義好的內建list樣式?- "android.R.layout.simple_list_item_1",注意這並不是我們定義的,在android系統中預設就有存在了。其中常用的的這些樣式如下所列:- android.R.layout.simple_list_item_1:一行text
- android.R.layout.simple_list_item_2:一行text較大,一行text較小
- android.R.layout.simple_list_item_single_choice:單選
- android.R.layout.simple_list_item_multiple_choice:多選按鈕
- android.R.layout.simple_list_item_checked:勾選盒
1234567891011121314151617181920212223242526272829303132333435363738394041424344454647484950
public class ListDemo3 extends ListActivity { /** Called when the activity is first created. */ ArrayList<HashMap<String,String>> list = new ArrayList<HashMap<String,String>>(); private SimpleAdapter adapter;? @Override public void onCreate(Bundle savedInstanceState) { super.onCreate(savedInstanceState);? //把資料加入ArrayList中 for(int i=0; i<mPlaces.length; i++){ HashMap<String,String> item = new HashMap<String,String>(); item.put( "food", mFoods[i]); item.put( "place",mPlaces[i] ); list.add( item ); }? //新增SimpleAdapter adapter = new SimpleAdapter( this, list, android.R.layout.simple_list_item_2, new String[] { "food","place" }, new int[] { android.R.id.text1, android.R.id.text2 } );? //ListActivity設定adapter setListAdapter( adapter );? //啟用按鍵過濾功能,這兩行資料都會進行過濾 getListView().setTextFilterEnabled(true); }? private static final String[] mPlaces = new String[] { "台北市", "新北市", "台南市", "高雄市", "苗粟縣", "台北市", "新北市", "台南市", "高雄市", "苗粟縣", "台北市", "新北市", "台南市", "高雄市", "苗粟縣", "台北市", "新北市", "台南市", "高雄市", "苗粟縣", "台北市", "新北市", "台南市", "高雄市", "苗粟縣", "台北市", "新北市", "789", "cde", "abc" };? private static final String[] mFoods = new String[] { "大餅包小餅", "蚵仔煎", "東山鴨頭", "臭豆腐", "潤餅", "豆花", "青蛙下蛋","豬血糕", "大腸包小腸", "鹹水雞", "烤香腸","車輪餅","珍珠奶茶","鹹酥雞","大熱狗", "炸雞排","山豬肉","花生冰","剉冰","水果冰", "包心粉圓","排骨酥","沙茶魷魚","章魚燒","度小月", "aaa","abc","bbb","bcd","123" };}?
執行的結果如下: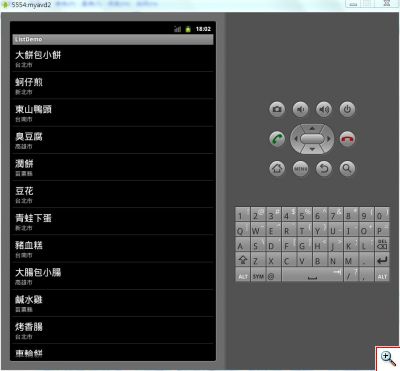 如果不要用android內附的simple_list_item_2,改用自己定義的樣式,要怎麼作呢?像上面的範例,再加上一個評分的字串在地點的旁邊。首先先製作一個給List的項目用的layout,如下的xml,取名為mylistview1.xml。
123456789101112131415161718192021222324252627282930313233
<?xml version="1.0" encoding="utf-8"?><LinearLayout xmlns:android="http://schemas.android.com/apk/res/android" android:layout_height="match_parent" android:layout_width="fill_parent" android:orientation="vertical"> <TextView android:text="TextView" android:id="@+id/textView1" android:layout_width="wrap_content" android:layout_height="wrap_content" android:layout_marginLeft="6dip" android:layout_marginTop="6dip" android:textAppearance="?android:attr/textAppearanceLarge"> </TextView> <LinearLayout android:layout_height="wrap_content" android:layout_width="wrap_content" android:id="@+id/linearLayout1" android:orientation="horizontal"> <TextView android:id="@+id/textView2" android:text="TextView" android:layout_height="wrap_content" android:layout_width="wrap_content" android:textAppearance="?android:attr/textAppearanceSmall"> </TextView> <TextView android:text="TextView" android:id="@+id/textView3" android:layout_width="wrap_content" android:layout_height="wrap_content" android:textAppearance="?android:attr/textAppearanceSmall" android:layout_marginLeft="6dip"> </TextView> </LinearLayout></LinearLayout>?
?
接下來要改一下程式碼,改用自己定義的item layout,利用R.java裡面的定義就行了(下面程式碼省略了rating這個sting array的定義,記得加上):12345678910111213141516
//把資料加入ArrayList中 for(int i=0; i<mPlaces.length; i++){ HashMap<String,String> item = new HashMap<String,String>(); item.put( "food", mFoods[i]); item.put( "place","地點:"+mPlaces[i] ); item.put("rating", "評分:"+mRatings[i]+" 星"); list.add( item ); }? //新增SimpleAdapter adapter = new SimpleAdapter( this, list, R.layout.mylistview1, new String[] { "food","place","rating" }, new int[] { R.id.textView1, R.id.textView2, R.id.textView3 } );?
?執行的結果如下:
下一步,加上圖 片吧…沒圖片很難有真相,圖片需要先放到res/drawable-xxxx目錄中(這裡只有放到res/drawable-hdpi中),抓取圖片用R.drawable.pic,不過因為HashMap的value部份需要用圖片(R.drawable.pic),是一個int的型態,所以HashMap的value部份需要改為Object,才能容得下int和string的類型。先將用於list的項目用的layout改一下,加上圖片在標題的左邊:
1234567891011121314151617181920212223242526272829303132333435363738394041
<?xml version="1.0" encoding="utf-8"?><LinearLayout xmlns:android="http://schemas.android.com/apk/res/android" android:layout_height="match_parent" android:layout_width="fill_parent" android:orientation="vertical"> <LinearLayout android:layout_height="wrap_content" android:layout_width="wrap_content" android:id="@+id/linearLayout1" > <ImageView android:layout_height="wrap_content" android:id="@+id/imageView1" android:layout_width="wrap_content" android:src="@drawable/icon"></ImageView> <TextView android:text="TextView" android:id="@+id/textView1" android:layout_width="wrap_content" android:layout_height="wrap_content" android:layout_marginLeft="6dip" android:layout_marginTop="6dip" android:textAppearance="?android:attr/textAppearanceLarge"> </TextView> </LinearLayout> <LinearLayout android:layout_height="wrap_content" android:layout_width="wrap_content" android:id="@+id/linearLayout1" android:orientation="horizontal"> <TextView android:id="@+id/textView2" android:text="TextView" android:layout_height="wrap_content" android:layout_width="wrap_content" android:textAppearance="?android:attr/textAppearanceSmall"> </TextView> <TextView android:text="TextView" android:id="@+id/textView3" android:layout_width="wrap_content" android:layout_height="wrap_content" android:textAppearance="?android:attr/textAppearanceSmall" android:layout_marginLeft="6dip"> </TextView> </LinearLayout></LinearLayout>?
?
再來要改一下程式碼,加上圖片和改Hashmap的value型態為Object(部份程式碼):12345678910111213141516171819202122232425262728293031323334353637383940
ArrayList<HashMap<String,Object>> list = new ArrayList<HashMap<String,Object>>(); private SimpleAdapter adapter;? @Override public void onCreate(Bundle savedInstanceState) { super.onCreate(savedInstanceState);? //把資料加入ArrayList中 for(int i=0; i<mPlaces.length; i++){ HashMap<String,Object> item = new HashMap<String,Object>(); item.put("pic", mPics[i]); item.put( "food", mFoods[i]); item.put( "place","地點:"+mPlaces[i] ); item.put("rating", "評分:"+mRatings[i]+" 星"); list.add( item ); }? //新增SimpleAdapter adapter = new SimpleAdapter( this, list, R.layout.mylistview2, new String[] { "pic","food","place","rating" }, new int[] { R.id.imageView1, R.id.textView1, R.id.textView2, R.id.textView3 } );? //ListActivity設定adapter setListAdapter( adapter );? //啟用按鍵過濾功能,這兩行都會進行過濾 getListView().setTextFilterEnabled(true); } private static final int[] mPics=new int[]{ R.drawable.pic1,R.drawable.pic2,R.drawable.pic3, R.drawable.pic4,R.drawable.pic5, R.drawable.pic1,R.drawable.pic2,R.drawable.pic3, R.drawable.pic4,R.drawable.pic5, R.drawable.pic1,R.drawable.pic2,R.drawable.pic3, R.drawable.pic4,R.drawable.pic5, R.drawable.pic1,R.drawable.pic2,R.drawable.pic3, R.drawable.pic4,R.drawable.pic5, R.drawable.pic1,R.drawable.pic2,R.drawable.pic3, R.drawable.pic4,R.drawable.pic5, R.drawable.pic1,R.drawable.pic2,R.drawable.pic3, R.drawable.pic4,R.drawable.pic5 };...?
?執行的結果如下: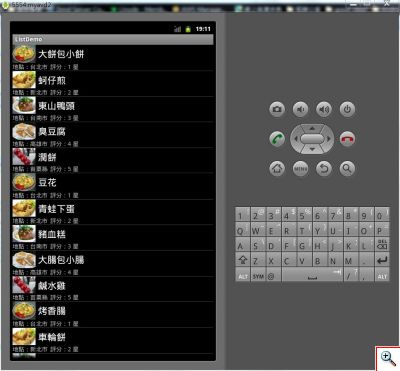 寫到這裡寫得篇幅有點多了,這只是把一些基本的listview顯示資料的方式記錄下來而已,還沒真正開始進行操作。以上圖片和文字僅供參考。
?
 如果不要用android內附的simple_list_item_2,改用自己定義的樣式,要怎麼作呢?像上面的範例,再加上一個評分的字串在地點的旁邊。首先先製作一個給List的項目用的layout,如下的xml,取名為mylistview1.xml。
 寫到這裡寫得篇幅有點多了,這只是把一些基本的listview顯示資料的方式記錄下來而已,還沒真正開始進行操作。以上圖片和文字僅供參考。